Showing posts with label entree. Show all posts

Thursday, 26 September 2013

Baked, stuffed mushrooms

Inspiration struck when I saw these beautiful grilling mushrooms at my local fruit and vegetable shop. I had to have them! Mushroom desire perhaps? Clearly I needed some protein, or perhaps it was just that I really like mushrooms.

Anyway, into the basket they went along with some feta cheese, prosciutto and some fresh herbs.

We had these as a starter and I served the leftover filling mixture on the side, so not to waste it. It was a very tasty little morsel.

You could also make these for a dinner party or as party food, although you may need to let them cool a bit before serving to your guests as finger food.

Monday, 24 June 2013

Eggplant and goat's cheese stack

Yes, I have a thing for eggplant. And yes, I have a real thing for goat's cheese. Combine them and I'm happy as a pig in you-know-what.

Look at this little stack of eggplant and goat's cheese. Isn't it pretty!

I used a variegated eggplant (white and purple stripes) so there was a little bit of extra colour, but the flavour was the same as a 'normal' purple eggplant. I made a tomato chilli jam to go onto the top, which was a little spicy, but really jazzed up the flavours of the other ingredients.

We had this with a grilled chicken breast and some salad. It was tasty and filling.

You could make this for a dinner party entree. I think it could be a real show-stopper when you bring it to the table. You could pre-grill the eggplant and keep it warm and also make the chilli jam beforehand, so this would be easy to quickly assemble.

Friday, 15 February 2013

Goat's cheese soufflé

Valentine's Day 2013. We don't really celebrate Valentine's Day in our house, although apparently the little people of the house seem to think we should. No flowers, chocolates or pressies here. But I do cook something a little special for our family to share.

This year, I decided on a Mediterranean-style menu with three courses taking inspiration from three different countries.

First course took inspiration from a little bistro in Provence France,  second course was from a tapas bar in Barcelona Spain, and dessert was from a trattoria in Tuscany Italy (or so we pretended!).

I hope your Valentine's day was a lovely one, whether you celebrate it on not. And I hope you enjoy this little tour around the Mediterranean.

These souffles were very light and tasty. Although it takes a little bit of effort, I like souffles. It is not something to eat every day, but something to save for a special occasion. Bonne Saint Valentin!

What you need

Made 6 small soufflés (made in half cup capacity ramekins)

1/2 cup packet breadcrumbs
40g butter
40g plain flour
250ml milk
50g grated cheddar cheese
50g crumbled goat's cheese
2 eggs, separated
1 teaspoon dried thyme

Extra butter for greasing the ramekins

To serve

Fresh rocket
1/2 ripe avocado, sliced
4 small slices goat's cheese

What to do

Heat the oven to 180 degrees Celsius. Boil a kettle full of water for later use.

Grease the ramekins well and place in the fridge or freezer to harden the butter.

While the ramekins are in the freezer, melt the 40g butter in a saucepan over medium heat. Once melted and bubbling, add the flour and mix well until combined . Turn the heat to low. Slowly add the milk and stir continuously until the mixtures thickens. Add the cheese and thyme and mix until well combined.

Set aside for 5 minutes to cool. Add the egg yolks and mix well. Season well with salt and pepper.

In a clean bowl, mix the egg whites with electric beaters until stiff peaks form.

Now, add half the egg whites back into the cheese mixture. Fold gently together with a metal spoon. Add the other half of the egg whites to the mixture until just combined.

Remove the ramekins from the freezer. Place a little breadcrumb in each ramekin and 'jiggle' the crumbs around the bottom and sides to ensure a coasting of crumbs all over the inside of the ramekin. Shake out any excess. (This helps to ensure that the egg mixture doesn't stick to the sides of the ramekin when it rises in the oven.)

Place the ramekins into an ovenproof dish, spaced evenly apart. Fill each ramekin to the brim with the egg mixture. Now pour the boiling water into the ovenproof dish, so that it comes half way up the sides of the ramekins.

Carefully put the dish into the oven.

Cook for 25 minutes until golden and very 'puffed'. Serve immediately with a side salad.

Tips for soufflés

  • Do not open the oven door while cooking. 
  • Be ready to serve these immediately from the oven to the table so that you will get to see the lovely fluffy soufflés at their best. The soufflés will start to deflate as soon as you take them from the oven.
  • I prepared the salad onto some large plates while the soufflés were cooking, so I could just place the little ramekins onto the plate and serve immediately.
  • It's all about timing to have a successful soufflé.

Wednesday, 9 January 2013

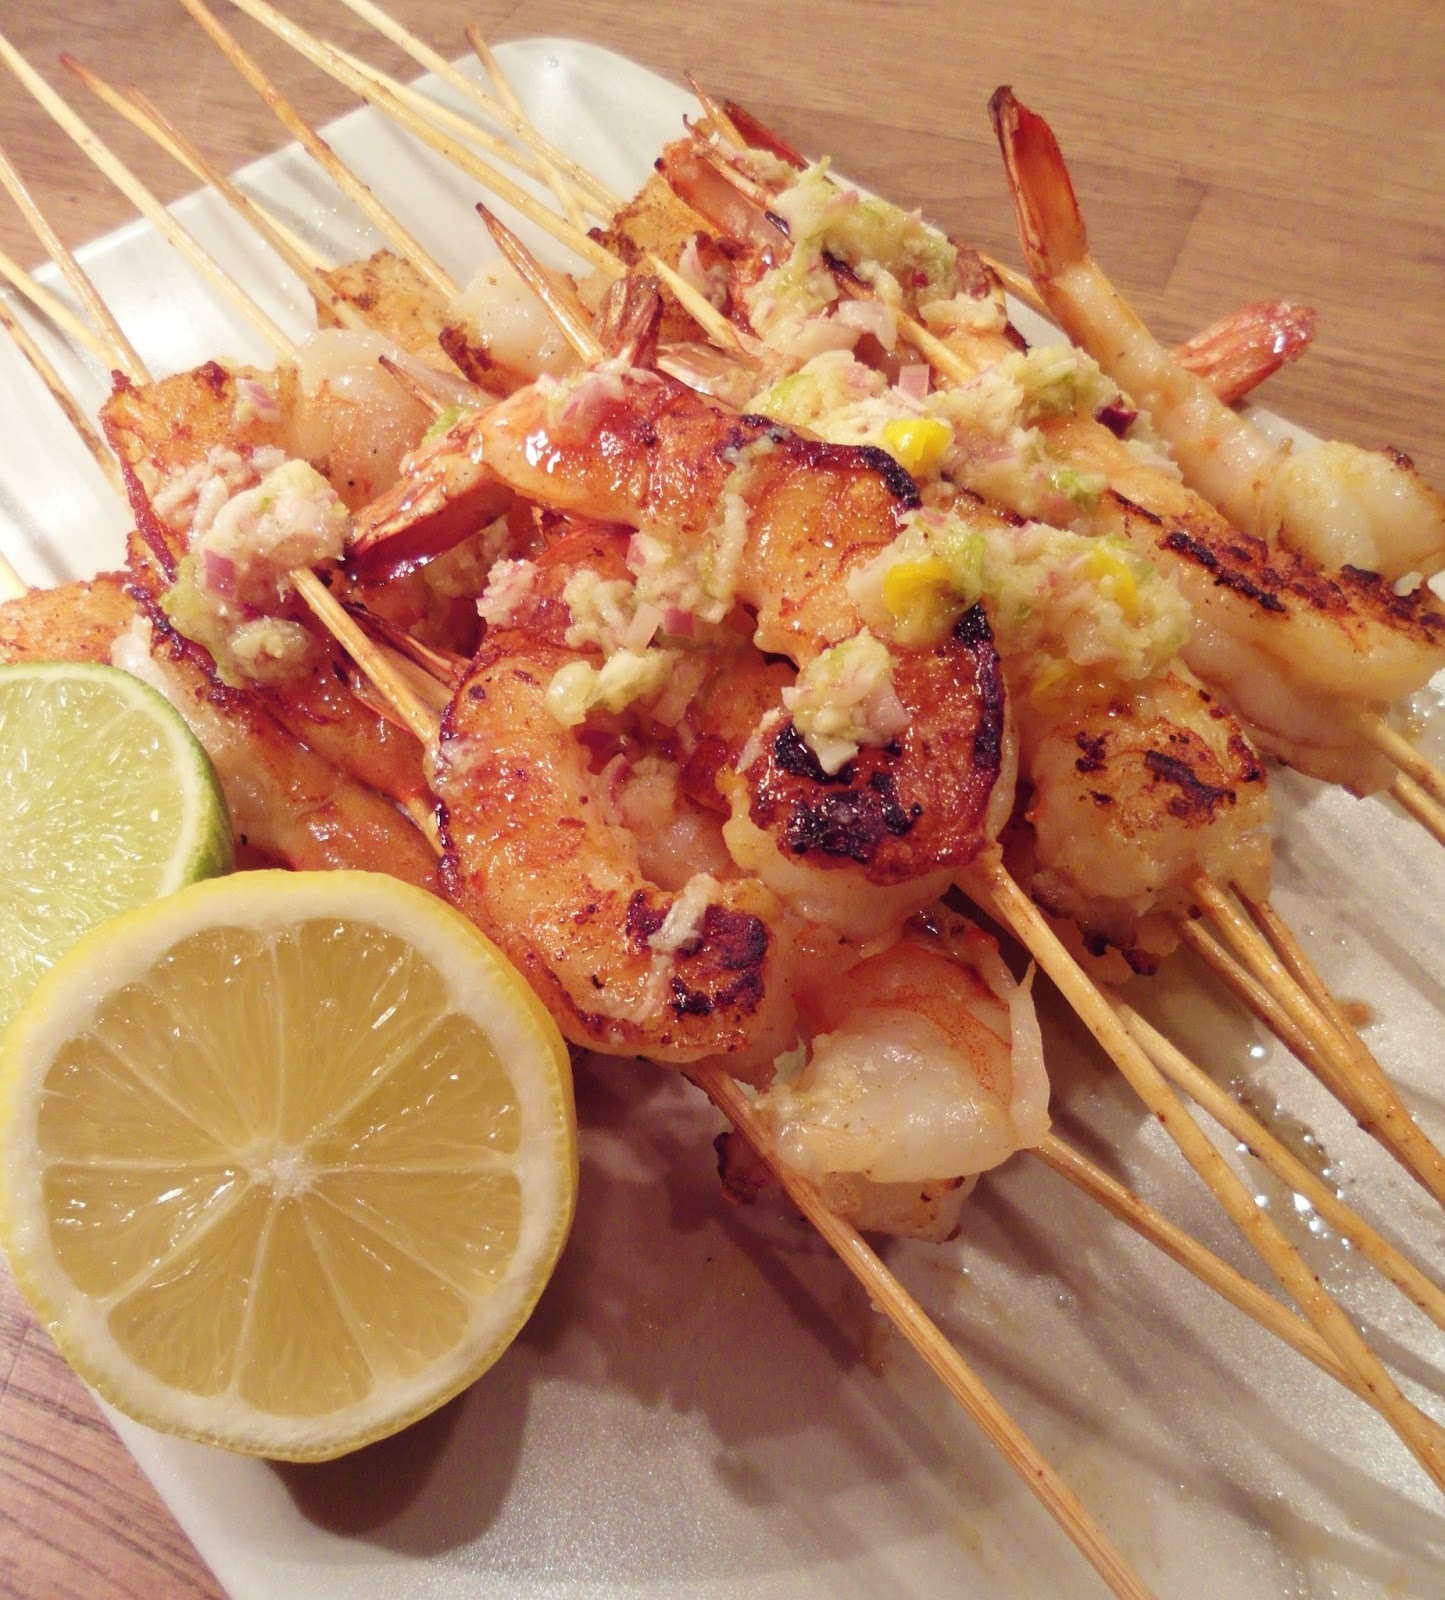
Lime and lemongrass prawns


We had a birthday dinner for the man-of-the-house yesterday. He designed a menu and I had to cook it as one of my gifts to him. He asked for these prawns, inspiration and partial recipe borrowed from Donna Hay.

Very simple, but these prawns were so very, very good. Firm, sweet prawn flesh with those little crunchy cooked bits on the outside. Then a spicy, sour sauce spooned over the top. The man was extremely happy with these.

I made a very spicy marinade/sauce, but I also kept some plain prawns for the children as they don't cope with too much spice. And a squeeze of lime over the top made these prawns very special.

I used frozen green prawns in the shell, so I had to peel them once defrosted, but it only took 5 minutes. I was very happy with the texture of the prawns, even though they were frozen.

I think if I made a double batch of these they would have been eaten. I made 25 prawns and they were gone within 5 minutes, with lots of 'yums' around the table.

What you'll need

Served four people as an entree

25 large green prawns, peeled with tails intact
25 bamboo or metal skewers

For the marinade/sauce
Juice and zest of 1 lime
Thumb-sized piece of fresh ginger, peeled and grated
3 small, fresh chillis, finely chopped
2 cloves garlic, finely chopped
2 small stalks of lemongrass, whacked/bruised with the back of a knife and finely chopped
Good pinch of salt

What to do

Thread the prawns onto the skewers. Try to straighten the prawns out as much as possible on the skewer.

Make the marinade. Combine all the ingredients in a food processor and whiz until combined. Or if you don't have a food processor, chop all the ingredients very finely and combine in a bowl. Spoon half the marinade over the prawns. Keep the rest in reserve to spoon over afterwards.

Heat a large pan or a bbq hot plate and grill the prawns for a few minutes either side until golden brown.

Once cooked, remove and place onto a serving plate. Drizzle the reserved marinade over the top and serve with extra lime to squeeze over. Simply delicious!

Thursday, 3 January 2013

Cauliflower Soup


This is a very easy and quick soup to make; it tastes great and is very impressive to serve to the table.

Basically this is a cauliflower puree, thinned out with a little stock and cream. That's it. Recipe follows.

What you'll need

1 head of cauliflower, cut into small florettes, with most of the stalk and all leaves removed
200ml pouring cream
2 cups chicken or vegetable stock
2 cups water
Salt and pepper
  

What to do

In a large pot bring the water and stock to the boil. Once boiling, add the cauliflower and cook until breaking apart (about 40 minutes). Keep the lid on. If you want a really thick soup, you can remove the lid and reduce the liquid for the last 10 minutes of cooking.

Remove from the heat and cool until just warm. Using a blender stick, blend the cauliflower until smooth. Add the cream and season with salt and pepper to taste.

Heat gently to serve. I served my soup sprinkled with some slivered almonds, crispy prosciutto pieces, fresh torn basil and crusty bread rolls. But it also goes beautifully with some crumbled goats cheese, freshly grilled scallops or prawns, some freshly chopped mint or just a sprinkle of fresh pepper.

Saturday, 17 November 2012

Gyoza (Japanese dumplings)


These little parcels are rather addictive. They are gyoza, or Japanese dumplings. I could sit down and eat a whole plate full and the little people are rather fond of them also. 

I prefer steamed gyoza but the 'pot-sticker' variety cooked in a frying pan and then steamed are also wonderful. The slippery wrappers are so yummy, and you can fill the gyoza with anything you like. The version above was made with minced prawns and some miso paste. But gyoza work really well with other seafoods such as scallops, minced chicken or pork and even vegetables such as sweet potato. 

The best part about this recipe is most of the hard work is done for you; the wrapper pastry is super cheap and can be found at any Asian shop or many supermarkets. All you have to do is whip up a bit of filling, squish the pastry together with a little water, then steam. Only problem is that you can never make enough; my family always want more!

This is an impressive dish to serve at a dinner party. You can prepare the gyoza beforehand and keep them in an air-tight container in the freezer until ready to cook. Your guests will think you are a super-chef! 

What you'll need

Serves six people as an entree, makes 30 gyoza
200g minced green prawn meat
1 tablespoon red miso paste, thinned with a teaspoon of warm water to make a thick paste


1 packet gow gee wrappers, containing 30 wrappers

What to do

Prepare the filling. Mix the miso paste with the prawn meat in a bowl.
Set aside. Place a clean tea towel on your work surface.

Open the packet of gow gee wrappers and peel off, one at a time. Be gentle, as the wrappers are fragile and can stretch and rip (which you don't want). Place the wrappers on your tea towel. (If you can't fit them all, place out half then do the rest later.)

Working quickly (or they will dry out), place 1 teaspoon of mixture into the centre of each wrapper. Once this is done, fill a small bowl with warm water. Dip your finger into the water and then run it around the edge of the wrapper.

Now fold the wrapper in half around the filling and seal it together (see picture right). It will seal where you have wet it. You can now cook the gyoza straight away or place them in an air tight container and put in the freezer until you are ready to cook. From experience, I think the gyoza stay together better if you put them in the freezer for at least an hour before cooking.


Cooking tips: You can steam the gyoza in a steamer basket (as below), but you MUST grease the basket with some vegetable oil first, or the gyoza will stick very well to the basket. Steam for five minutes and serve immediately while hot.

You could also fry the gyoza in a little vegetable oil in frying pan over medium heat. Once they are brown on one side, pour in a cup of warm water, replace the lid and remove from the heat. The gyoza will then steam in the heat of the pan. Leave for 3 minutes, drain, then serve immediately.

Storage tips: Layer the gyoza between layers of baking paper or greaseproof paper in an air tight container with a lid. When layering, make sure you leave a little space between each gyoza, or else they will stick together. I prefer to make and cook these on the same day, but you could keep them for up to a week.

Dipping sauce tips: Serve with a dipping sauce made from soy sauce with a squeeze of fresh lime juice and some wasabi.

Monday, 22 October 2012

Pumpkin and goat's cheese ravoli


Little dinner party here on Saturday night for some special people.

I prepared the entire dinner on Friday night and Saturday morning, as I knew I would be out of the house for the whole of the afternoon before my guests' arrived. I was slightly stressed about this, but it ended up being fine and the food I'd prepared required a little heating up, cooking and serving.

I made these pumpkin ravoli on Saturday morning and stored them in an air-tight container. It then took only five minutes to cook them and serve them. These ravoli, made with wonton wrappers, are very easy to prepare, look spectacular and are so yummy to eat. If you've never made your own ravoli, give this a go. You can fill them with basically anything. I've tried the following combinations:

  • Sun-dried tomatoes, goat's cheese and fresh herbs
  • Bolognese sauce
  • Roasted pumpkin and goat's cheese
  • Left-over braised lamb shanks.
You can also make 'Asian style' gyozas or pot stickers, using a filling of scallops, or mined chicken and prawns. But I'll put a recipe up for those at another time.

What you'll need

Makes 30 ravoli. As an entree, I served three to each person.

300g packet (or 60 wrappers) gyoza wrappers, available from any Asian food shop or some supermarkets
1 cup of mashed pumpkin flesh. I roasted my pumpkin in the oven first.
100g soft goat's cheese
Salt and pepper

Fresh basil, melted butter and Parmesan cheese to serve.

What to do

Mix the pumpkin and goat's cheese in a bowl. Season well.

Lay a clean tea towel on your kitchen bench. Peel off the gyoza wrappers and lay on the tea towel. Place a heaped teaspoon of the pumpkin mixture into the centre of each wrapper.
Place a small bowl of warm water next to the tea towel. Dip one or two fingers into the water. Then run your fingers around the outside margin of the gyoza wrapper, wetting it slightly all the way around. Place another wrapper on top of the pumpkin mixture and seal it with the bottom wrapper (press it together with your fingers). You can also flatten the pumpkin mixture as you go. Repeat until all the ravoli are made. 

Transfer to an air-tight container, using baking paper in between layers of ravoli, so they don't stick together.
These ravoli stay together better if you make them before-hand and then store in the fridge or freezer for cooking later. For example, make them in the morning for cooking that evening.

To cook, place a large frying pan (I use an electric frying pan) to heat and fill with salted water. Once the water is boiling, place half of the ravoli into the water. Don't overcrowd the pan, or the ravoli will stick together. Once the ravoli 'pastry' becomes transparent, the ravoli are cooked. This will take 2 or 3 minutes. Carefully remove from the water with a slotted spoon to drain the water. (The ravoli are very delicate so be careful or they will break apart.) Place the ravoli onto warmed serving plates. Cook the remaining ravoli and spoon onto serving plates.

Drizzle with some melted butter, freshly chopped basil and some grated Parmesan cheese.

These delicate, slippery ravoli are definitely a crowd-pleaser and your guests will be very impressed.


Saturday, 13 October 2012

Pumpkin Soup


Here's a warming, healthy and delicious pumpkin soup recipe. The temperatures have taken a sudden dip, so I made a huge pot of this soup during the week. I gave half to someone who's a bit sick, and the rest we ate to warm us up on a grey day.

Basically this soup is vegetable puree, which you can then make thinner with some water or milk or leave as thick as you like. Make a double batch as it freezes very well. Enjoy with a little natural yoghurt and crispy prosciutto or a sprinkle of toasted nuts on top. It is also wonderful with some curry powder added to the mix and a cup of coconut milk poured in at the end. And always eat with some crusty bread.

What you'll need

Serves many bowls - approximately 8  -10 people, with some leftover to freeze.

2kg butternut pumpkin, de-seeded, peeled and chopped into large pieces
2 large potatoes, peeled and chopped into large pieces
2 large carrots, peeled and roughly chopped
2 cloves garlic, peeled and minced
2 large onions, peeled and roughly chopped
2 chicken stock cubes
1 tlbsp vegetable oil
Water
Salt and pepper

Natural yoghurt to serve

What to do

Heat the vegetable oil in a very large soup pot, over medium heat.

Once the oil is hot, add the pumpkin and saute for approximately 10 minutes, stirring constantly, until the pumpkin starts to brown slightly. Add the garlic, potatoes, carrots and crumble in the chicken stock cubes.
Now pour in enough water to cover all the ingredients.

Bring to a simmer, then reduce heat to low. Place the lid on the pot and let the vegetables cook until very soft (approximately 60 to 90 minutes.) Season well towards the end of the cooking time.

Let cool, then blend the soup, either with a stick blender or food processor. I like a smooth soup, so I blend it until there are no lumps.

Return to the cooking pot to heat. If you want to make the soup a little thinner, you can add a cup or two of water or milk.

Serve with a dollop of natural yoghurt and some crusty bread.


Sunday, 7 October 2012

Antipasto.... or a little snack


Here's a little something we ate last night with a cold glass of Italian prosecco. It was a little bit too early to cook dinner and too late for something heavier than a few tasty asparagus tossed in the pan, some salty cheese and beautiful fresh tomato.

This was quick and easy, and it was devoured by the little and big people. You could say it was our little weather celebration. Yesterday was hot here, but today I think that Autumn has really arrived. Time to get out the winter clothes and shoes I think!

Make this for friends. Give them each a fork, a serviette and a glass of wine and say,'Dig in!' You could call it a 'deconstructed' salad, although that is a fairly 'wanky' term. Alternatively, serve it with a bit of crusty bread for a light lunch or even dinner.

What you'll need


Serves four as a snack.

I bunch of asparagus, woody stems trimmed.
2 large, vine-ripened tomatoes, thickly sliced
1 x 200g packet haloumi cheese, sliced into fingers
Juice of one lemon
Salt and pepper
1 tsp olive oil to grease the pan


What to do


Place a pan over high heat. Add the olive oil. Add the asparagus to the pan and cook, turning frequently for about five minutes, or until the asparagus is starting the become soft and slightly browning. Remove from the pan.

Add the haloumi and cook for five minutes, turning once when it is brown on one side.

Arrange the tomato, asparagus and cheese on a plate, sprinkle with a little salt and freshly-ground pepper and squeeze over the lemon juice. Serve while the cheese and asparagus are still hot.

Tuesday, 25 September 2012

Chorizo and haloumi skewers


I'm back! I've been away a little while, settling the little people into school. I did naively think that I might have some more time for blogging/cooking/myself once I had two children at school, but unfortunately no. Not at the moment anyway. There have been lots of meetings, sports classes, music classes, new friends to meet, and a birthday for the young man thrown into the mix. I am ready for a holiday please.

Here are some skewers I made for a picnic we had with some friends. The picnic was held in the middle of the afternoon, and everyone was asked to bring some snacks and drinks and a blanket to sit on. Luckily we had a nice sunny day and a beautiful, peaceful park. The children had a great time playing in the sand, climbing and running about with their friends. The parents also had a great time sitting in the sun, eating and having a laugh.

Here's the recipe - happy picnicking. (You could also make these skewers for a bbq or party food.)

What you'll need


Makes approximately 30 skewers

500g Haloumi cheese, chopped into 2cm cubes
200g chorizo sausage (or any type of dried sausage that you prefer) sliced into 1cm pieces
1 yellow or green capsicum, deseeded and sliced into 2cm squares
1 punnet cherry tomatoes
Juice of 1 lemon

Bamboo skewers, soaked in water for 10 minutes.

What to do

Assemble all the ingredients. Place the ingredients onto the skewers. I started with haloumi, then sausage, capsicum, tomato, haloumi, finishing with sausage. For the vegetarians, just leave the sausage out and add some more capsicum and tomato.

Once you have assembled all the skewers, place them onto a baking paper-lined baking tray. Heat the grill in your oven to high heat. Then grill the skewers, turning once during cooking. Grill for approximately 10 - 12 minutes, until the haloumi starts to go slightly brown and the tomatoes start to blister and wrinkle.

Remove from the oven. Place in a serving container with a lid and squeeze over the lemon juice. Put on the lid, take to your picnic and enjoy while sitting in the sun, drinking a glass of cold prosecco.

Thursday, 6 September 2012

Pumpkin, potato and feta tart

Pumpkins are now in season in Austria. There are all kinds of shapes and sizes in the shops now. Mostly local people do not eat pumpkin or know how to cook it. However, pumpkin oil is a popular ingredient here
Here's a quick and tasty recipe for a free-form tart using pumpkin and a few other ingredients.

We ate this for dinner, along with some green salad. The squishy and sweet pumpkin complemented the crunchy pastry and the slightly melted feta. And all these ingredients are freely available at any shop, so you could easily whip up this tart on a weekend or after work. If you don't have feta, you could use goat cheese, or ever mozzarella or grated cheddar. I also sprinkled some chopped, fresh parsley for some colour and flavour, but you could also use fresh basil, thyme or oregano.

This would be wonderful served for lunch or brunch. For us it was a late dinner after school meetings.

What you'll need

This tart serves four as a side dish or two as a light meal.

1 piece of puff pastry, 40cm x 30cm
2 large potatoes, thickly sliced
150g pumpkin, peeled, de-seeded and thickly sliced
50g feta cheese, cubed
1 onion, thinly sliced
2 tbl vegetable oil
2 tbl chopped fresh parsley (or substitute with basil, thyme or oregano)
Salt and pepper

What to do


Heat two frying pans over medium to low heat. Add the 1 tablespoon of oil to each. In one frying pan, put the onion and sweat for a few minutes. Add the potato. Season with salt and pepper. Cook, stirring and turning constantly until potato is soft and caramelised. This will take about 15 minutes.

In the other frying pan at the same time as the potato is cooking, cook the pumpkin. Stir and turn so that it doesn't burn, but it is OK for it to brown and caramelise. Season with salt and pepper. Once the pumpkin is a little bit soft, remove it from the heat.

Preheat the oven to 180 degrees Celsius.

Prepare the pastry tart. 

I made my pastry in a free-form shape, as I didn't have a pastry tin in the shape I wanted. If you have a tin you can use, go ahead. First I shaped the pastry into a long rectangle, using my fingers to crimp the edges and squish it into shape. Next I placed the shaped pastry onto a sheet of baking paper, then placed it into a large baking tray. On three sides, the pastry touched the sides of the baking tray, on the fourth, I propped up the baking paper against the side of the pastry with a wooden spoon. This helped keep the shape of the pastry, otherwise it will fall flat once it heats up. Prick the bottom of the pastry with a fork, then place into the hot oven for approximately 15 minutes, or until slightly golden brown.

Remove from the oven and let cool for a few minutes. The middle of the tart will have puffed up. This is OK. You can leave it as is, as the weight of the ingredients will push it back down.

Assemble the tart.

First layer the potato and onion mixture onto the bottom of the tart, then carefully layer the pumpkin on top of this (just so it looks pretty!). Then insert the pieces of feta (or whatever cheese you use) between the pieces of pumpkin. Sprinkle with the parsley or whichever herbs you use.

Place back in the oven, at 180 degrees Celsius, for 10 - 15 minutes. This is only to reheat the tart and crisp the pastry further, as all the ingredients are already cooked. Remove from the oven and serve immediately.

You can serve the tart by itself for a light meal, or as a side dish with grilled fish or chicken. You could also make individual-sized tarts which would be lovely to serve at a dinner party.


Friday, 17 August 2012

Sausage rolls


The little people and I whipped up these sausage rolls in 10 minutes, and dinner was on the table half an hour later.

This was 'spur of the moment' cooking. We are going away for a week's holiday, so I have let the fridge run down. I thought I had some lasagna in the freezer that I was going to defrost for the little people, but someone must have eaten it!

I had some beef mince, so I popped across the road to the convenience store from some shortcrust pastry, and there you have it - sausage rolls.

These looked impressive baking in the oven, tasted great and were a hit with the children. These would be great as a Sunday afternoon footy snack, served at the children's party, school lunchboxes, or even as an easy weekend lunch, with some salad.

What you'll need

*This recipe made three large sausage rolls, which I sliced into eight smaller pieces each, so about 24 small sausage rolls. 

500g beef mince
2 eggs
1/2 cup dry breadcrumbs
1/2 tsp each dried thyme and dried rosemary
1 clove garlic, minced
1 tbl Worcestershire sauce
20 g melted butter
Salt and pepper

275g packet shortcrust pastry, approximately 45cm x 25cm. Pastry sliced into three sections, 15cm wide.

What to do


Preheat the oven to 180 degrees Celsius.

Mix mince with breadcrumbs, herbs, eggs and garlic. Season well with salt and pepper.

Lay out the pastry on a lined baking tray. Cut it into three sections, 15cm wide. Spoon one third of the mince into the middle of the pastry, then spread it out with your fingers so that you have a long 'sausage' of mince running down the center of the pastry, from top to bottom. This is a great job for little people.


Fold each side of the pastry into the middle over the mince, and join at the top. I just squished the pastry together with my fingers to join it together.

Using a pastry brush, paint some melted butter into each roll to help the pastry brown. I sprinkled the rolls with some dried thyme and some salt.

Place in the oven and bake for 25 minutes.

Once brown, remove from the oven and let cool for five minutes. Slice with a sharp knife into whatever size you'd like.

Serve with tomato sauce (of course) and some salad for a meal or by themselves for a snack.


Wednesday, 15 August 2012

Haloumi, chorizo and roasted capsicum salad


This salad was a part of the meal we ate last night with our cousin. It accompanied rib-eye steaks with chimichurri sauce. Obviously I am becoming Austrian, as the salad contains meat and cheese. But not just any cheese - haloumi - fried Greek/Cypriot cheese, what joy!

This salad would be great to serve at a bbq or you could serve it as a stand-alone dish for lunch with some crunchy bread and a glass of cold white wine. It is a big, hearty salad; nothing diet about this dish. But there is plenty of taste and texture.

I roasted my own capsicum for this recipe, but you could just buy some at the shops if you like.

What you'll need

*This salad serves six to eight people as a side dish.

For the salad
4 capsicums, roasted, skin removed and roughly chopped into slices OR 200g shop-bought roasted capsicum, roughly chopped. I used red and yellow capsicum.
3 chorizo sausages, thinly sliced
400g haloumi cheese, thickly sliced
1/2 cup fresh basil, thinly sliced
700g tinned, white beans, rinsed

For the dressing
1/4 cup olive oil
5 tbl balsamic vinegar
Salt and pepper

What to do

Heat a large frying pan on high heat. Place the cheese into the pan and fry until brown and crispy, turn and repeat on the other side. Once cooked, you can chop the haloumi into smaller, bite-sized pieces or leave it larger.

Heat another frying pan on medium heat and cook the chorizo until brown and fragrant. Drain on some paper towel to remove the oil.

Combine all the ingredients in a large bowl, pour over the dressing and mix well to combine.

Serve immediately while still warm.  


Sunday, 12 August 2012

Tofu with lime, ginger and chilli


This tofu dish was a very quick addition to our dinner a few nights ago. (Please note that I am not a hippy or a vegetarian, but I don't mind the occasional feed of tofu.)

Man of the house said he was extra hungry and needed 'feeding up' which I took as a personal affront to my cooking skills (but of course he did not mean that), so I thought, "I'll fix you fella!"

I had already planned to cook steamed chicken with Asian noodles, but I thought the tofu might go along nicely, and as I had it in the fridge it was a no-brainer.

This recipe takes five minutes to make; it is super quick and has some wonderful Asian flavours. We had the tofu cold this night, but in the past I have pan-fried the tofu to warm it up a little, and this is also a lovely way to eat it.

And the man was very plump afterwards, so my mission was successful.

This tofu is also really excellent eaten the next day after marinating overnight in the fridge. It soaks up the flavours wonderfully.

What you'll need


*Serves two to four people as part of an Asian banquet.

500g packet firm tofu (don't use silken tofu as you'll end up with soup)
Juice and zest of one lime
2 tbl soy sauce
1 tbl vegetable oil
Thumb-sized piece of ginger, peeled, then grated or minced
1 large clove of garlic, minced
2 medium-sized red chillis, finely chopped, with seeds (or less or more depending on how hot you like it)
1 tbs rice wine or plain white vinegar
1 tbl Japanese Mirin (or substitute with 1 tsp caster sugar)

What to do


Place the piece of tofu on a plate or serving platter. Cut it into cubes approximately 5cm square.

Mix all the other ingredients in a bowl until combined, then pour over the tofu.

Leave to marinate for five minutes, then serve in the middle of the table as a part of an Asian banquet.

The marinade from the tofu is really tasty, so I suggest you don't waste it, but pour it over rice or something else you are eating at the time.