Showing posts with label dinner party. Show all posts

Tuesday, 3 November 2015

Honey soy salmon parcels


My daughter cooked this salmon, about 95 per cent on her own. How great is that! I heated the oven, put the parcels in to cook, then took them out when they were cooked. That's it. So, needless to say, this is very easy for children (my daughter is 10) to make with minimal supervision. And as an added bonus, it was very tasty and filling. We all enjoyed it very much.


What you will need

Serves four

Four pieces of salmon, skin off, about 100g each
2 cups fresh or frozen beans
1 cup fresh or frozen peas
2 teaspoons honey
1 tablespoon soy sauce
1 small finger of ginger, peeled and finely chopped
Olive oil

What to do

Preheat the oven to 180 degrees.

On an oven tray, lay four pieces of aluminium foil, approximately 20cm x 20cm. Lightly grease each sheet with some oil, using a pasty brush. Gently turn up the edges of each piece of foil so that your sauce will not run out when you pour it over.

If using fresh beans, top and tail them. If using frozen vegetables, put the beans and peas in a colander and run some warm water over them in the sink, to defrost them. Drain well of excess water. Divide the vegetables evenly between the sheets of foil (place in the middle). Carefully place the fish pieces on top of the vegetables.

In a small bowl, mix the honey and soy sauce with a spoon until the honey is dissolved.

Drizzle this over the fish and vegetables. Sprinkle some ginger over the top of the fish (this is optional, you may not like ginger pieces).

Now close the salmon parcels, bringing the left and right sides of the foil together over the fish. Crimp together so it will not pull apart. Fold up the remaining sides into the middle of the parcel so that the sauce will not run out and the steam will be tapped inside.

Place into the oven and cook for 25 minutes. Once cooked, remove from the oven and leave to cool slightly before opening (watch out for the steam). Serve to the table in the parcels. Serve with some cooked rice or noodles.

Wednesday, 22 October 2014

Baked eggplant with feta, tomatoes and herbs


Yes, I admit it, I have a thing for eggplant. I am seeing someone about it - my green grocer. He's very helpful.

Here is another way to cook this most wonderful fruit (yes, it is a fruit!)

Mini caramel tarts


What I love most about this recipe; it's just so pretty! What I love second best; it has dulce de leche in it! What I love third best; crunchy, biscuity base. It goes on and on.....

Wednesday, 7 May 2014

Panfried salmon with crunchy Asian-style salad


It's been a while, sorry! We moved apartments, so I've been a little busy getting everything in order at the new place.

If you've read any of my recipes, you will know I have a thing for lots of texture in my food, crunch in particular is my thing. This recipe with salmon and lots of crunchy vegetables ticks the crunch box for me. The freshness of the vegetables, herbs and nuts provides a good contrast to the richness of the salmon.

Monday, 7 October 2013

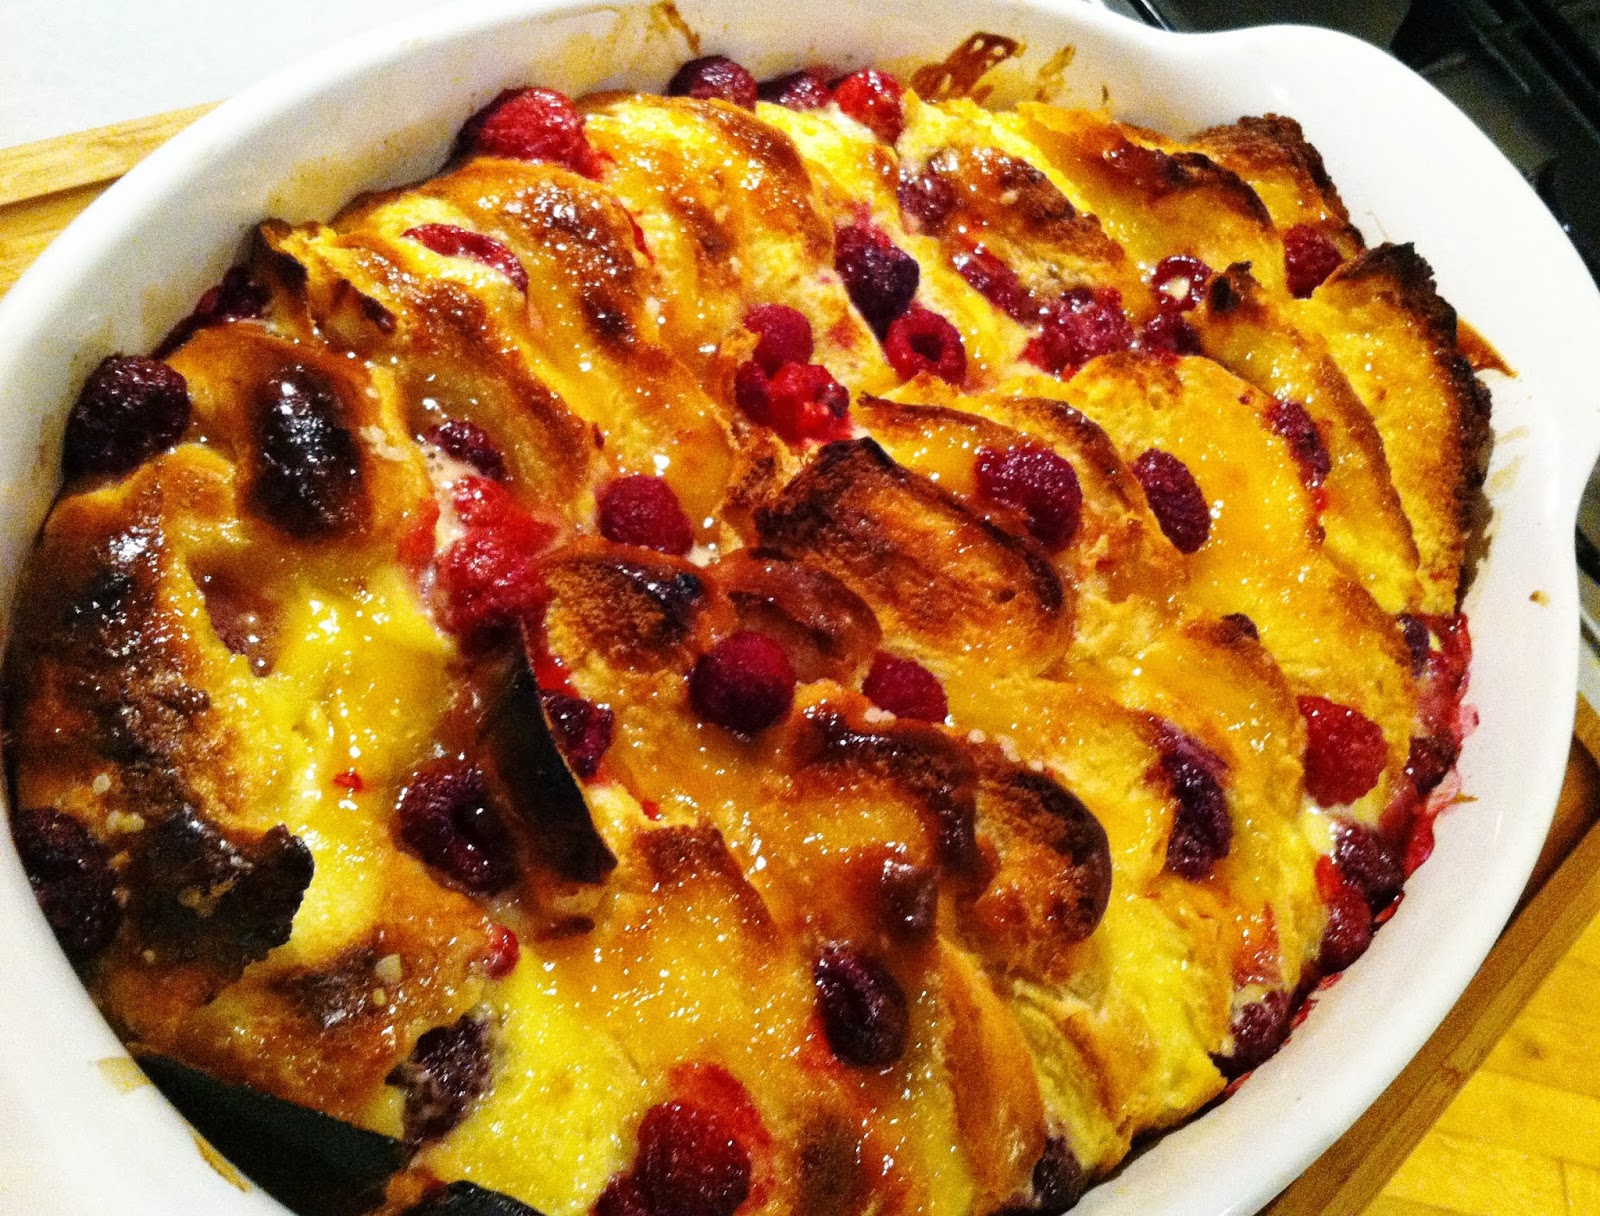
Lemon curd and raspberry brioche pudding


Ok, serious dessert business here people. An absolute delight to eat, and not too difficult to make. I whipped this up while I had guests sitting at the table. It took about 10 minutes to put together, then 30 minutes in the oven. I served the dish to the table and everyone helped themselves with a good splodge of mascarpone. There were seconds eaten....speaks for itself really!

Sunday, 6 October 2013

Toasted waffles with custard berry cream pots


This is a complete cheat's dessert. Pick up a few ingredients from the shop and you can whip this up in about five minutes. The only 'cooking' required is the toasting of the waffles in the toaster. The rest is just 'placement' of the ingredients. But, it still looks very pretty and of course, tastes good.

You could easily make the custard berry cream pots a few hours before and store in the fridge until you are ready to serve. I think this would be a great dessert for a dinner party - it is visually stunning, but doesn't take too much effort. The perfect recipe for when you want to sit with your guests not be in the kitchen all evening.

Thursday, 26 September 2013

Baked, stuffed mushrooms

Inspiration struck when I saw these beautiful grilling mushrooms at my local fruit and vegetable shop. I had to have them! Mushroom desire perhaps? Clearly I needed some protein, or perhaps it was just that I really like mushrooms.

Anyway, into the basket they went along with some feta cheese, prosciutto and some fresh herbs.

We had these as a starter and I served the leftover filling mixture on the side, so not to waste it. It was a very tasty little morsel.

You could also make these for a dinner party or as party food, although you may need to let them cool a bit before serving to your guests as finger food.

Tuesday, 10 September 2013

Flourless orange cake


I'm thinking of the best way to describe this cake. 'Moist' is probably the first adjective that comes to mind, 'citrussy' is another, and perhaps 'morish'. This is a really lovely cake to add to your repertoire. It is easy to make, is gluten-free, tastes so wonderful, and is superb to take along as a contribution to morning or afternoon tea.

It is a little extra time and effort to make the syrup that accompanies this cake, but it is worth it. It gives the cake that extra dimension and turns it into something really special.

Serve warm with some mascarpone and a drizzle of the syrup and a hot cup of coffee for a wonderful treat.

With thanks to our friends the Hofmanns for providing the beautiful lake setting for afternoon tea.

Friday, 2 August 2013

Chocolate caramel coconut slice


Behold this morsel of sweet goodness!

It contains some of my favourite ingredients - chocolate, caramel and coconut. Combined together, these ingredients make this divine little slice.

My lovely daughter requested a batch of this slice as a birthday treat. She also helped with the making and baking, which was fun, as we were able to lick our sweet, sticky fingers afterwards.

Word of warning - this slice is very sweet, so you only need a very small square to satisfy. A 2cm square is plenty, and will ensure that the slice stretches far.

Monday, 24 June 2013

No bake caramel tart

This picture is fairly self-explanatory. This is heaven on a plate - that is all!

Ok, maybe a bit more explanation is needed is you'd like to sample the above bit of heaven.

I had a hankering for something sweet last night. The above is what I came up with after looking through the panty and the fridge. There are three ingredients used here - oat biscuits, mascarpone and dulce de leche caramel. No baking or cooking, just a bit of spooning and layering! I think it turned out rather well.

As a bit of background, my Mum makes the most amazing caramel tart. She always uses boiled canned condensed milk as her caramel, which for me is almost the most delicious thing in the world. It's a bit of a fiddle to boil the condensed milk, so, a few weeks ago when I walked past a Mexican grocery shop and saw they had 'dulce de leche' caramel in the window, I got a little excited. So in I popped and grabbed a few jars.

If you've never had dulce de leche, you need to try it. It is divine - a thick, sweet, vanilla-flavoured, proper caramel. I give a warning here - it is edible from the spoon. And I think it is nothing like that awful product sold in supermarkets that claims to be caramel - yuk. 

So, this little dessert was made up in 5 minutes and devoured by me soon after that. I loved the crunch of the biscuits, the sweetness of the caramel and the luscious cream. For me, it was the perfect combination and it really sorted out my sweet craving.

You can't make this in advance, it is assemble and eat immediately. Enjoy in moderation!

Wednesday, 3 April 2013

Donna Hay's baked chocolate custard


These baked chocolate raspberry custards were luscious and a nice end to a lovely dinner.

The recipe is from Donna Hay. You'll find it here or in her book 'simple dinners.' I think I overcooked my custards a little; the texture was a little more 'cake' than 'custard', but they still tasted wonderful, especially with the tangy raspberries.

Give this recipe a try for dinner parties or for a family dinner. You can make them beforehand, then store in the fridge until needed. You could serve them warm from the oven, or have them cold from the fridge as I did.

Friday, 15 February 2013

Torta caprese al limone

Italian flourless lemon and white chocolate cake or Torta caprese al limone.

Heaven on a plate right here and the third course of our Valentine's Day dinner.

I'm not really sure where the inspiration came from for this cake. I've never cooked anything like it before, but I am so glad I did. Usually, if I bake a cake or make a dessert, it involves chocolate. But I am learning and branching out and trying different flavours.

This cake was so moist and lemony and sweet and crunchy and lots of other great adjectives. Man of the house said it was 'something I could make again', mumbled around mouthfuls of cake, and the little people will eat anything that looks vaguely like a cake - not the most objective observers - but they liked it too. The house smelled wonderful while this was baking - lots of lemon and almond smells wafting from the oven. I liken it a bit to eating a lemon tart, but as a cake. That's what the flavour's reminded me of.

You could serve this as a dessert with a dollop of cream or natural yoghurt or make it for a morning tea with friends. It is a rich and dense cake, so you don't need a huge slice, but it is well worth the effort.

See our Valentine's entree and main course.

Buon San Valentino!


What you'll need

Made one large cake, approximately 12 to 14 pieces.

200g butter, chopped into cubes
200g white chocolate, broken into bits
5 eggs, separated
200g caster sugar
Zest of three whole lemons
60ml lemon juice
1 tsp vanilla essence or seeds from one vanilla bean
360g almond meal

Extra butter to grease the cake tin
Icing sugar to dust
Thickened cream or yoghurt to serve


What to do


Preheat the oven to 180 degrees Celsius. Prepare your cake tin. I used a 22cm spring-form non-stick cake tin. Grease the tin with butter, then line the bottom and sides with baking paper.

Melt and chocolate and butter together, either over very low heat in a saucepan or in the microwave. Once melted and combined, then set aside to cool slightly.

In a bowl, cream the sugar and egg yolks together with electric beaters until the mixture is pale and fluffy. 

Add the lemon zest, juice and vanilla. Mix well to combine. Add the almond meal and chocolate mixture and stir with a spoon to combine.

In another bowl, beat the egg whites until stiff peaks form. Fold half the egg whites back into the chocolate mixture, mixing very gently. Now fold the remaining egg whites and fold until just combined. 

Pour the mixture into the prepared cake tin. 

Place in the oven and bake at 180 degrees for 10 minutes. Then reduce the heat to 150 degrees and bake for another 75 minutes.  Check if it is cooked using a wooden skewer inserted into the middle of the cake. 

This cake is very dense due to the nuts so it will need all its cooking time, if not a little extra.

Once cooked, remove from the oven and let stand in the pan for 15 minutes. Then remove from the pan and place on a wire rack to cool completely.

To serve, sprinkle the cake with icing sugar and cut slices. Serve by itself or with a dollop of cream or natural yoghurt.

The outside and top of this cake crisped nicely, and the middle was luscious, moist and dense. The lemon flavour was strong, but I really like that. As I said, heaven on a plate!

Tip

The top of this cake will brown very quickly, so after 10 minutes baking you may want to place a piece of foil or baking paper on the top of the cake to prevent it from going too brown. 

Spanish-style tapas plate

Second course for the Valentine's Day dinner was inspired by tapas-style eating from Spain.

I wanted a few little things that we could taste, but I didn't want anything too heavy, as we were having a three-course meal.

So, we had a grilled lamb cutlet, with a tiny splodge of black olive tapenade; a grilled prawn topped with a slice of chorizo sausage and a sprinkle of chilli salt; and zucchini ribbons with lemon and garlic and some steamed asparagus.

Having a few mouthfuls of each taste was lovely, even though the flavours were very different. It was similar to having three entrees at once.

See our Valentine's entree and dessert.

Feliz Día de San Valentín!


What you'll need

Made four individual tapas plates.

4 frenched lamb cutlets
4 green King prawns, peeled but with tail intact
8 think slices Chorizo sausage
8 fresh asparagus spears

For the zucchini
1 medium-sized zucchini, cut into thin ribbons (I used a vegetable peeler to make the ribbons)
Juice and zest of half a lemon
1 French eschallot, finely sliced
1 clove garlic, finely chopped

Salt and pepper
Dried chilli flakes (for the prawns)
Olive oil for grilling
Good quality, shop-bought olive tapenade

What to do

Make the zucchini. Heat a pan over medium heat. Add a little olive oil. Add the eschallot and garlic and sauté for 3 minutes. Add the zucchini and cook for five minutes until it softens. Remove from the heat and season with the lemon juice and zest and salt and pepper. Set aside to keep warm.

Heat two fresh pans over medium heat. Add a little olive oil to both pans.

In one pan, add the lamb cutlets. Cook for about 3 minutes on one side, then turn and cook on the other side. Season well with salt and pepper.

In the other pan add the prawns and sausage and cook for three or four minutes until heated through. Remove from the heat.

Steam the asparagus in a steamer or a little boiling water until just cooked. Drain.

Now plate the dish. Place the lamb cutlet on one side of the plate. Spoon on a little bit of the shop bought tapenade.

In the middle, place one prawn, top with two slices of sausage, then sprinkle over a few dried chilli flakes.

Finally, make a small pile of the zucchini ribbons, and top with the asparagus spears.

Serve with a glass of chilled white wine or Prosecco. Delicious.

Goat's cheese soufflé

Valentine's Day 2013. We don't really celebrate Valentine's Day in our house, although apparently the little people of the house seem to think we should. No flowers, chocolates or pressies here. But I do cook something a little special for our family to share.

This year, I decided on a Mediterranean-style menu with three courses taking inspiration from three different countries.

First course took inspiration from a little bistro in Provence France,  second course was from a tapas bar in Barcelona Spain, and dessert was from a trattoria in Tuscany Italy (or so we pretended!).

I hope your Valentine's day was a lovely one, whether you celebrate it on not. And I hope you enjoy this little tour around the Mediterranean.

These souffles were very light and tasty. Although it takes a little bit of effort, I like souffles. It is not something to eat every day, but something to save for a special occasion. Bonne Saint Valentin!

What you need

Made 6 small soufflés (made in half cup capacity ramekins)

1/2 cup packet breadcrumbs
40g butter
40g plain flour
250ml milk
50g grated cheddar cheese
50g crumbled goat's cheese
2 eggs, separated
1 teaspoon dried thyme

Extra butter for greasing the ramekins

To serve

Fresh rocket
1/2 ripe avocado, sliced
4 small slices goat's cheese

What to do

Heat the oven to 180 degrees Celsius. Boil a kettle full of water for later use.

Grease the ramekins well and place in the fridge or freezer to harden the butter.

While the ramekins are in the freezer, melt the 40g butter in a saucepan over medium heat. Once melted and bubbling, add the flour and mix well until combined . Turn the heat to low. Slowly add the milk and stir continuously until the mixtures thickens. Add the cheese and thyme and mix until well combined.

Set aside for 5 minutes to cool. Add the egg yolks and mix well. Season well with salt and pepper.

In a clean bowl, mix the egg whites with electric beaters until stiff peaks form.

Now, add half the egg whites back into the cheese mixture. Fold gently together with a metal spoon. Add the other half of the egg whites to the mixture until just combined.

Remove the ramekins from the freezer. Place a little breadcrumb in each ramekin and 'jiggle' the crumbs around the bottom and sides to ensure a coasting of crumbs all over the inside of the ramekin. Shake out any excess. (This helps to ensure that the egg mixture doesn't stick to the sides of the ramekin when it rises in the oven.)

Place the ramekins into an ovenproof dish, spaced evenly apart. Fill each ramekin to the brim with the egg mixture. Now pour the boiling water into the ovenproof dish, so that it comes half way up the sides of the ramekins.

Carefully put the dish into the oven.

Cook for 25 minutes until golden and very 'puffed'. Serve immediately with a side salad.

Tips for soufflés

  • Do not open the oven door while cooking. 
  • Be ready to serve these immediately from the oven to the table so that you will get to see the lovely fluffy soufflés at their best. The soufflés will start to deflate as soon as you take them from the oven.
  • I prepared the salad onto some large plates while the soufflés were cooking, so I could just place the little ramekins onto the plate and serve immediately.
  • It's all about timing to have a successful soufflé.

Wednesday, 30 January 2013

Mango, lime and coconut cheesecake


Cheesecake recipe time. Here's a summery-flavoured mango cheesecake with a double lot of crumbs - one on the bottom and one on the top. What could be better right! Lovely, summery flavours of mango, coconut and lime in a delicious cheesecake. Very, very good.


What you'll need

Makes six individual cheesecakes. I used glass containers with a 1.5 cup capacity.

For the base
125g butter
150g plain sweet biscuits
1/2 cup dessicated coconut

For the filling
Juice and zest of 3 limes
350g cream cheese
340g tin of condensed milk
Flesh of one ripe mango, finely chopped

For the topping
Fresh mango flesh
Lime zest
Dollop of thickened cream


What to do

Make the base. Using a food processor, finely process with biscuits. Or if you don't have a food processor, place the biscuits into a plastic bag and bash them with a rolling pin. Pour the crumbs into a bowl and mix in the coconut. Melt the butter and pour into the biscuit mix. Stir well with a spoon.

Grease your individual containers with a little melted butter. Using half the biscuit mixture, divide evenly between the six containers. Reserve the other half of the mixture for afterwards, but don't put it in the fridge. Press down the crumbs with your fingers or the back of a spoon. Place in the fridge to set for about 10 minutes.

In a large bowl, combine the cream cheese and condensed milk. Mix well to remove any lumps. Once smooth, add the lime juice and zest. The mixture will thicken. Add the mango and fold through. Divide the mixture evenly between between the six containers. Place in the fridge to set for about half and hour.

Divide the remaining crumb mixture into each container, sprinkling it evenly to make the top crust.

Place in the fridge to set for approximately 4 hours.

To serve, dollop a spoon of cream on top of the crumbs, sprinkle some fresh, chopped mango flesh and a little lime zest. Eat in moderation, this is a little addictive.


Wednesday, 23 January 2013

Pork and pineapple stack

Here's a sunshine recipe. 'What is a sunshine recipe?' I hear you ask quite sensibly.

For me, a sunshine recipe is a meal that you make using ingredients or flavours that take you back to a sunny, summer day somewhere in the past.

This recipe did this for me - the sweet, juicy, yellow pineapple and the spicy, colourful dressing reminded me of a hot, sunny day in Queensland - my home State in Australia. Of lazy weekends mowing the lawn, thunder storms, being all sweaty and jumping into the pool for a dip, of bbqs and a cold glass of wine. Fairly remarkable that one little pineapple can do all that!

Anyway, enough reminiscing about times past. Onto the recipe for a stack of pork steaks and grilled pineapple, with a few prawns on top and a chilli and lemongrass dressing. This was just the dish for a cold and snowy evening in the depths of winter in Vienna.

The pineapple provided the inspiration and the ingredients in the fridge and freezer did the rest. Oh the beauty of having a well-stocked fridge with lots of different ingredients to choose from. It is great when you don't have to trek out in the snow to the shops at the last minute.

What you'll need


Served two people.

2 pork steaks or fillet, approximately 150g each
4 pineapple slices (preferably with the core in tact)
4 large green prawns, peeled
Olive oil for grilling the meat and pineapple
Salt and pepper for seasoning

For the dressing
Juice and zest of one lime
1 red chilli, chopped finely
1 tablespoon sweet chill sauce
1 dessert spoon honey
1 teaspoon fish sauce
Good pinch salt
1 small stalk of lemongrass, bruised and the fleshy bottom part chopped finely
Handful fresh basil or mint leaves, stalks removed and chopped finely

To serve
Lime and ripe avocado slices

What to do

Make the dressing. Add all the dressing ingredients into a small bowl and mix well to combine. Set aside.

Heat two frying pans over medium heat. Add a little oil to each. Grill the pork steaks in one pan, until cooked to your liking. I like my pork a little pink in the middle, so about 8 minutes cooking time altogether. Season well with some salt and pepper.

At the same time as the pork is cooking, add the pineapple pieces to the other pan and grill until caramelized on both sides. This will take about 6 minutes.

Once pork and pineapple is cooked, set aside to rest for a few minutes.

Keep the pineapple pan heated and throw in the prawns. Cook for two minutes until just cooked. Remove from the pan and set aside.

Now assemble the dish. Slice each pork steak in half horizontally (so you end up with four thinner pork steaks).

On a large plate, place one pineapple slice. Place one of the pork steaks on top, then repeat with one more pineapple slice and steak. Place two prawns on top, then spoon as much dressing as you like over the whole dish. Place the sliced avocado on the side with a piece of lime and serve immediately.

We ate this with a crunchy cabbage and snow pea salad. It would have been lovely with a glass of crisp, white wine, but it was a tad cold for that.  Enjoy your little taste of sunshine.

Wednesday, 9 January 2013

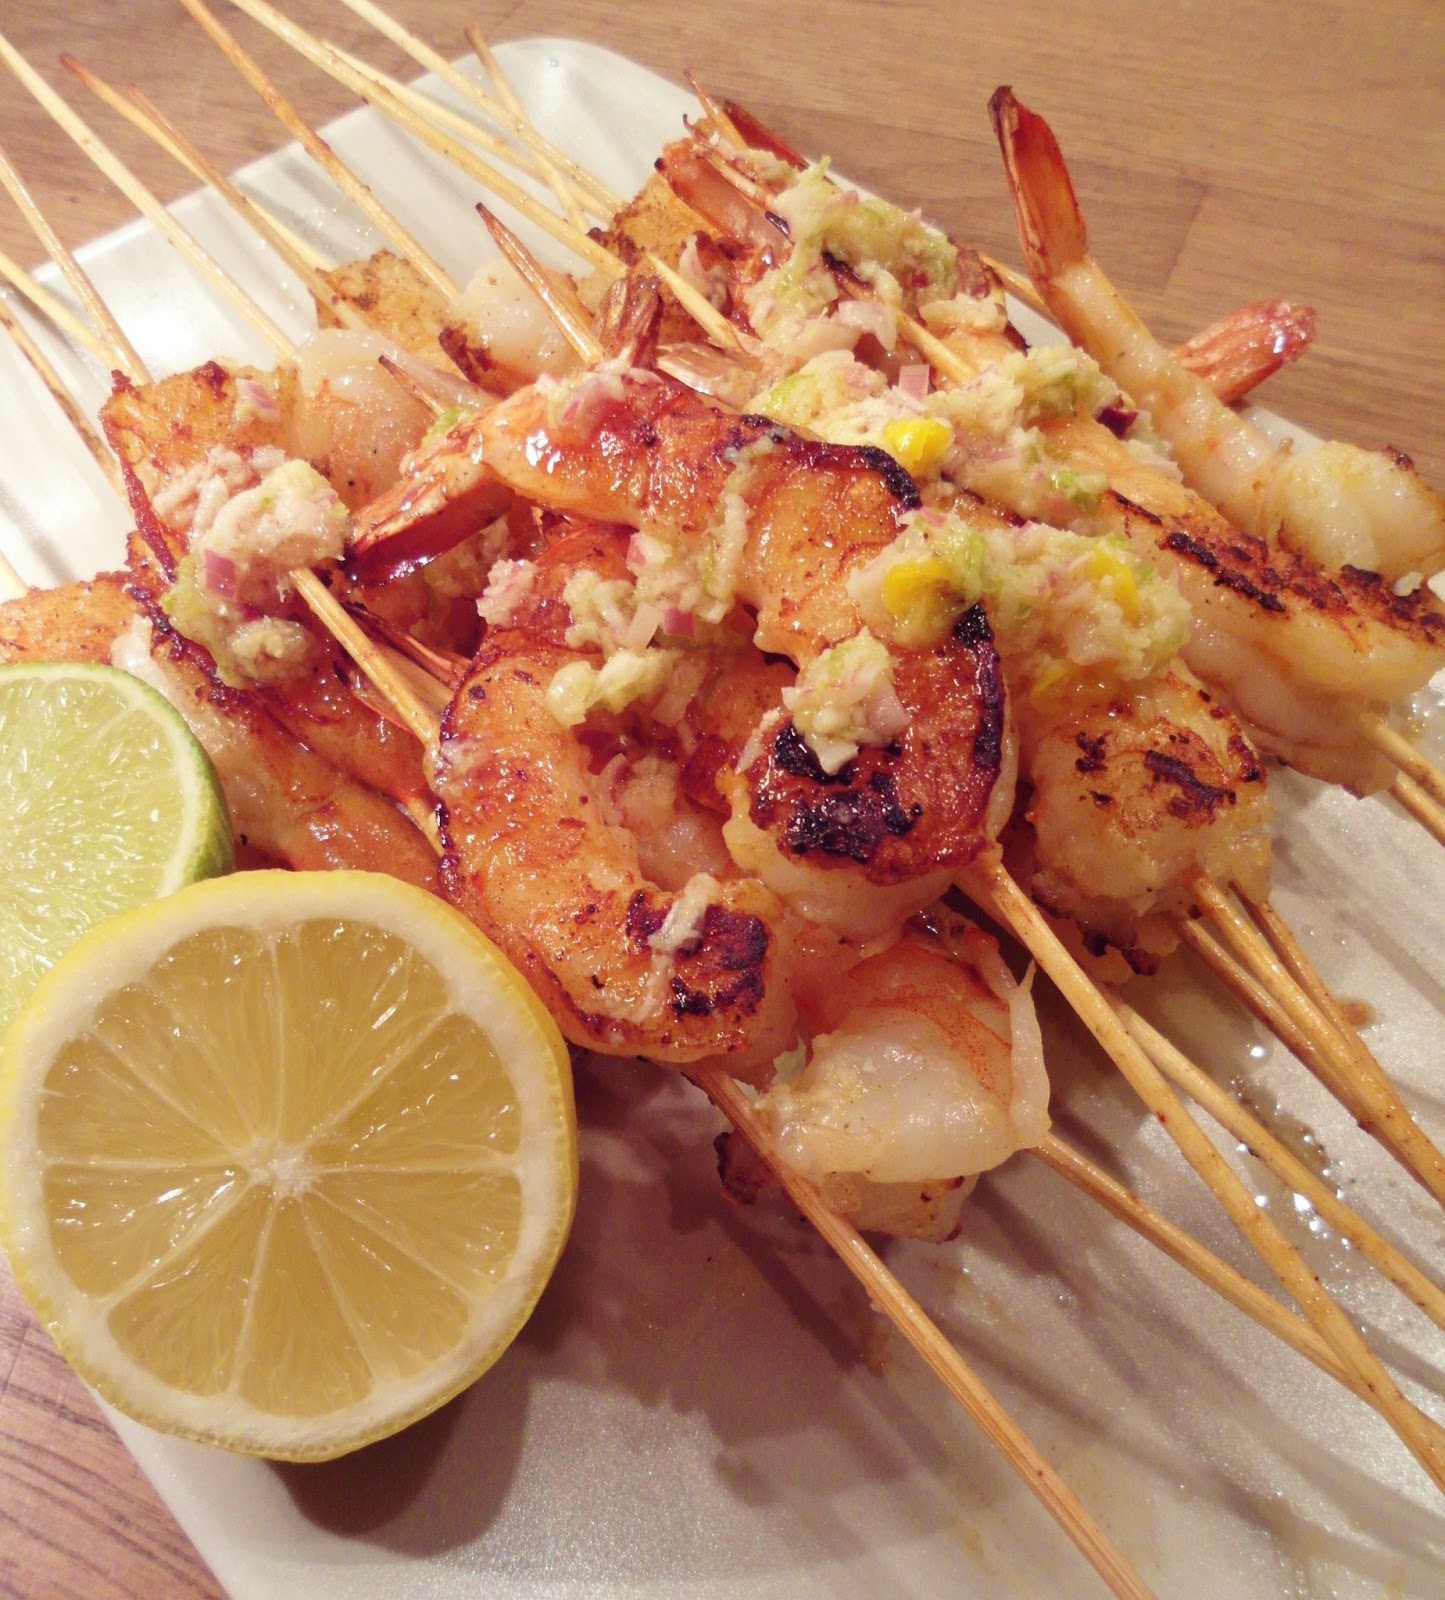
Lime and lemongrass prawns


We had a birthday dinner for the man-of-the-house yesterday. He designed a menu and I had to cook it as one of my gifts to him. He asked for these prawns, inspiration and partial recipe borrowed from Donna Hay.

Very simple, but these prawns were so very, very good. Firm, sweet prawn flesh with those little crunchy cooked bits on the outside. Then a spicy, sour sauce spooned over the top. The man was extremely happy with these.

I made a very spicy marinade/sauce, but I also kept some plain prawns for the children as they don't cope with too much spice. And a squeeze of lime over the top made these prawns very special.

I used frozen green prawns in the shell, so I had to peel them once defrosted, but it only took 5 minutes. I was very happy with the texture of the prawns, even though they were frozen.

I think if I made a double batch of these they would have been eaten. I made 25 prawns and they were gone within 5 minutes, with lots of 'yums' around the table.

What you'll need

Served four people as an entree

25 large green prawns, peeled with tails intact
25 bamboo or metal skewers

For the marinade/sauce
Juice and zest of 1 lime
Thumb-sized piece of fresh ginger, peeled and grated
3 small, fresh chillis, finely chopped
2 cloves garlic, finely chopped
2 small stalks of lemongrass, whacked/bruised with the back of a knife and finely chopped
Good pinch of salt

What to do

Thread the prawns onto the skewers. Try to straighten the prawns out as much as possible on the skewer.

Make the marinade. Combine all the ingredients in a food processor and whiz until combined. Or if you don't have a food processor, chop all the ingredients very finely and combine in a bowl. Spoon half the marinade over the prawns. Keep the rest in reserve to spoon over afterwards.

Heat a large pan or a bbq hot plate and grill the prawns for a few minutes either side until golden brown.

Once cooked, remove and place onto a serving plate. Drizzle the reserved marinade over the top and serve with extra lime to squeeze over. Simply delicious!

Monday, 7 January 2013

Golden Staircase Pie


During the Christmas holidays, I remembered a pie/tart/cake that my Mum used to make when I was younger. It had luscious layers of sweet lemon, orange and vanilla custards, a crumbly pastry and cream. I started thinking about this cake, dreaming about it even. So therefore, I had to make it..... Luckily we had a dinner invitation to a friend's house for New Year's Eve, so I had a great excuse to make something a little bit special.

It was called a Golden Staircase Pie. My Mum made this pie and served it in her cafe. And although it was stunning to look at and popular with customers, I have never seen this served in any other cafe or restaurant I've visited. Even 'Google' could not provide me with a picture of this pie, only two or three recipes in the whole 'interweb'. My recipe is adapted from the Epicurean website.

Anyhow, I ploughed ahead, found a recipe which I adapted to local ingredients and here's the result.  It was good, excellent even. The textures were as I remembered them; crumbly pastry, creamy lemon layer, the firm orange custard layer in the middle and the soft vanilla layer on top. The difference in my recipe to those that I've found and that which my Mum used is the addition of passion fruit. I didn't have any passionfruit, so I left them out, but you could add this fruit to the bottom level and spoon over the top as a nice 'tropical' taste to the pie. I think you could also add some chopped or canned pineapple onto the top to serve. 

I'd save this cake for a special occasion, as  it is a little bit of any effort to make it. It's not difficult, it just takes some time as you have to wait for each layer to set before making the next layer. But definitely worth it.

What you'll need

Makes one large cake, 10 - 12 pieces.

For the pastry

125g butter, at room temperature
70g caster sugar
1 egg yolk
1 cup self-raising flour
45g cornflour
35g plain flour
4 teaspoons milk

For the bottom lemon level

200ml lemon juice
325ml sweetened condensed milk

For the middle orange level

100g caster sugar
250ml orange juice
4 heaped teaspoons custard powder
4 heaped teaspoons cornflour
4 teaspoons lemon juice

For the top vanilla custard level

60g butter, at room temperature
250ml milk
6 heaped teaspoons cornflour
6 teaspoons caster sugar
1 teaspoon vanilla extract

To serve 

Thin slices of whole orange and lemon or pulp from three passionfruit
Whipped thickened cream

What to do


Step 1 - make the pastry
Cream butter and sugar until pale and fluffy, then add the egg yolk. Sift flours together. Add flours to the mixture, then add the milk. If the pastry is too sticky, add a bit more plain flour until it comes together into a ball. Roll out pastry to a 1cm thickness. Grease and line a 22cm pie plate or springform cake tin. Put in the pastry and press into the corners of the tin. Leave an overhang that you can cut off later. Bake in a 180 degree Celsius over for 20 minutes until golden. Remove from the oven and let cool completely in the tin.

Step 2 - first layer
Mix condensed milk and lemon juice together. Stir and it will thicken after a little while. Pour the mixture into the baked and cooled pie pastry. Place in the fridge to cool and set.

Step 3 - second layer
Heat juices over low heat in a small saucepan. Mix together the custard powder, cornflour and sugar. Add to warmed juices. Stir with a whisk until thickened (this happens very suddenly, so don't leave the pot). Cover with a lid to prevent a skin forming. You will end up with a very thick orange custard. Cool the mixture, then spread over first layer. Chill in the fridge until well set.

Step 4 - third layer
Heat the milk gently in a small saucepan. Mix the cornflour together with a little milk and stir well. Add the cornflour mix to the warm milk, stirring continuously. Cover with a lid and set aside to cool.
Cream butter and sugar well with electric beaters. Beat in the cooled cornflour/milk mixture. Gradually add vanilla. Spread over orange juice layer. Chill well.

Step 5 - decoration
Once set, spoon or pipe whipped cream over the cake. Lay slices of orange and lemon over the cream and spoon over passion fruit pulp if you like. Slice using a heated knife and serve immediately.


Thursday, 3 January 2013

Cauliflower Soup


This is a very easy and quick soup to make; it tastes great and is very impressive to serve to the table.

Basically this is a cauliflower puree, thinned out with a little stock and cream. That's it. Recipe follows.

What you'll need

1 head of cauliflower, cut into small florettes, with most of the stalk and all leaves removed
200ml pouring cream
2 cups chicken or vegetable stock
2 cups water
Salt and pepper
  

What to do

In a large pot bring the water and stock to the boil. Once boiling, add the cauliflower and cook until breaking apart (about 40 minutes). Keep the lid on. If you want a really thick soup, you can remove the lid and reduce the liquid for the last 10 minutes of cooking.

Remove from the heat and cool until just warm. Using a blender stick, blend the cauliflower until smooth. Add the cream and season with salt and pepper to taste.

Heat gently to serve. I served my soup sprinkled with some slivered almonds, crispy prosciutto pieces, fresh torn basil and crusty bread rolls. But it also goes beautifully with some crumbled goats cheese, freshly grilled scallops or prawns, some freshly chopped mint or just a sprinkle of fresh pepper.

Monday, 26 November 2012

Creamy prawn and avocado pasta


I think I should have made a very large pot of this dish. It was so, so tasty that the man of the house and I polished it all off and were looking for more.

My inspiration was a packet of frozen green prawns. The rest of the ingredients were already in the fridge.

The creamy sauce and big, plump prawns stuck nicely to the flat ribbons of papardelle. And the hint of fresh chilli and basil lifted the sauce so it was not to heavy.

I'll be making this one again, for sure.

What you'll need

Served two, with no leftovers!

200g packet frozen, peeled, green prawns
1 brown onion, finely chopped
2 cloves garlic, minced
2 fresh red chillis, finely chopped
1 tablespoon Dijon mustard
1 cup pouring cream
1 medium avocado, peeled and sliced
2 teaspoon vegetable oil
Handful fresh basil, torn into small pieces
Handful of fresh Parmesan cheese, finely grated

Fresh cooked pasta to serve.

What to do


Heat one teaspoon of the oil in a large frying pan. Once hot, add the onion and garlic. Reduce the heat to medium, stirring constantly. You don't want the onion and garlic to colour, just soften. Once soft, remove from the pan to a bowl and set aside.

Increase the heat to high. Add a little more oil to the pan. Add the prawns and saute over high heat, until pink. This should take about 5 minutes. Reduce the heat to low. Once much of the heat has gone out of the pan, add the onion mix back into the prawns. Stir in the mustard and chillis. Remove the pan from the heat. Now add the cream and stir well into the other ingredients. 

While the sauce is still hot, mix through or spoon over cooked pasta. I used parpardelle. Top with sliced avocado, torn basil leaves and cheese. Simply delicious!