Showing posts with label snack. Show all posts

Wednesday, 7 May 2014

Cheesy bacon and egg pies


Quick idea for school lunch boxes, or perhaps an after school snack. Or you could just make a batch of these and keep on hand in the fridge for hungry people for breakfast. Or a picnic. Just about anywhere really!

Tuesday, 26 November 2013

Salmon and potato cakes


Lunch, snack or dinner idea today. These salmon cakes were baked in the oven, basically because I was a bit pressed for time and didn't want the mess of crumbing. Although oven-baking the cakes doesn't give you the crispy coating that crumbing would, at a guess I'd say there would be much less fat as there is no shallow-frying in oil or butter.


Tuesday, 10 September 2013

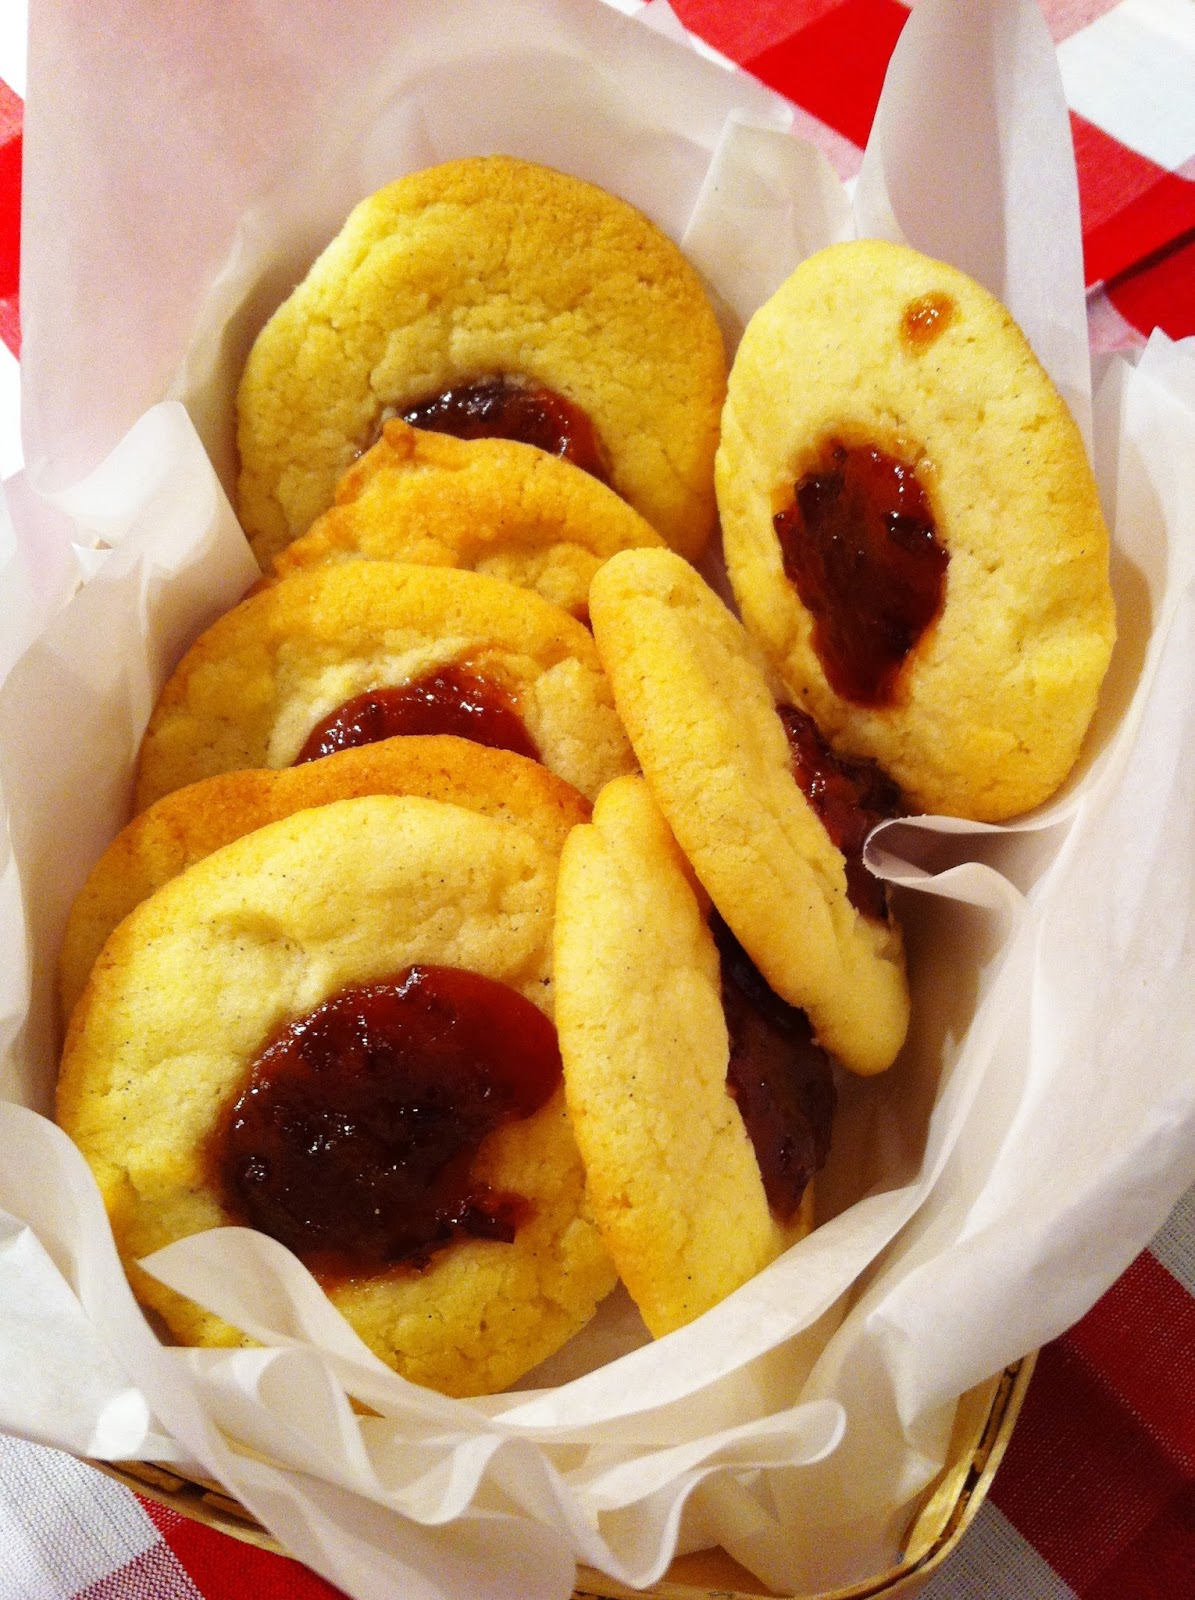
Jam Drops

I like a good bikkie on occasion, especially with a cup of tea. A bikkie with a good dollop of sweet jam in the middle rates right up there.

I made these jam drops to take to a BBQ we were invited to. It was something a bit different than turning up with a cake or a bottle of wine. And the day of the BBQ was extremely hot, so bikkies went down a treat.

Luckily for me, I was given six jars of homemade jam recently. So I was able to use this jam in the middle of my jam drops - thanks Melanie for the jam. I put it to good use.


Monday, 24 June 2013

Donna Hay's sweet potato wrapped in speck


Look at these little beauties. When I saw this recipe in the latest Donna Hay magazine (pp 123 Jun/July 2013 issue)  I knew I had to make it straight away. What a simple idea, but really wonderful.

If you can't buy speck (a type of prosciutto made from pork shoulder) use prosciutto.

Once cooked, the sweet potato becomes squishy and sweet, while the speck becomes crispy and imparts its salty flavour into the potato.

Great as a side dish served with chicken, beef or lamb. Or you could just make up a huge tray of these for a bbq or yummy finger food.

Monday, 11 March 2013

Baked sticky chicken wings


Yum alert! Sticky finger food is so good, if a little messy. But that's what finger bowls are for!

These sticky chicken wings are easy to make, inexpensive and everyone loves them. That ticks all the boxes at my house. Enjoy these while watching your favourite footy team go around with a cold beer. Bliss!

Wednesday, 13 February 2013

Hazelnut, raspberry and dark chocolate muffins

Quick muffin recipe today, inspired by a bag of frozen raspberries in the freezer. 

I used some hazelnut meal in the mix, just for something different. I kept the sugar quite low in the recipe, as I wanted to squidge in some dark chocolate pieces after they were cooked for something a bit different. 

These muffins were lovely and tart from the raspberries, had  a great texture from the hazelnut meal and the melted dark chocolate was just a bit decadent. 

I also made these muffins using ripe banana, instead of the raspberries.  Just substitute the raspberries for one cup of mashed, ripe banana. You could also use blueberries to make another variety of this recipe.


What you'll need


Made 10 medium-sized muffins

1 1/2 cups wholemeal flour (or use white flour if that is what you have)
1 cup hazelnut meal
1 teaspoon baking powder
2 eggs, lightly beaten
1 cup milk
1/2 cup caster sugar
1 cup of frozen or fresh raspberries
10 squares of dark chocolate

Butter for greasing the muffin tins.

What to do

Preheat your oven to 180 degrees Celsius. 
Place the flour, meal, sugar and baking powder in a bowl. Mix together well. Make a well in the middle.

Add the milk and eggs. Mix together until just combined. The mix should be wet and 'thickly drip' off the back of your mixing spoon. If not, add either more flour or more milk. 

Finally, add the raspberries and mix through.

Grease the muffin tin well with butter.

Spoon with muffin mixture evenly into each tin - you should end up with about 10 muffins.

Cook in the oven for about 30 minutes. 

Check with a wooden skewer placed into the middle of some muffins if they are cooked. If the skewer comes out clean, the muffins are cooked. If the skewer comes out with muffin mixture on it, cook for another 5 minutes.

Remove from the oven. Now, using a small knife, made a little cut in the top of each muffin. Then slide the chocolate piece into the muffin, leaving a little hanging out. The chocolate will melt inside the muffin. 

Serve the muffins while still warm. Yum!

Saturday, 15 December 2012

Rum Balls

Ok, it's Christmas. So here are the start of the festive recipes.

Rum balls have a great tradition in our family. There was always a big bowl of them on every Christmas morning breakfast table or at Christmas parties during December. I really love them, especially the condensed milk, which I have a slight addiction to. I am rather proud to say that I've passed the addiction onto my kids!

We have always made run balls with crushed Weetbix being the main ingredient. I now see rum ball recipes made with crumbled Christmas cake or chocolate cake. Sorry folks, but it's not the same. Weetbix versions are way better in my opinion.

You can make rum-free versions for the little ones if you like, but I feel that there is such a small amount of alcohol in each rum ball that it is really not necessary. And the rum flavour is really what makes these special. But it is up to you.

I like to make several batches of rum balls and then package them up in glass jars to give as gifts. Best to get them all out of the house otherwise they all get eaten up! 

Merry Christmas. 

What you'll need

Makes 20 - 30 small rum balls

9 Weetbix, finely crushed
1/2 cup desiccated coconut, plus 1 cup extra coconut to roll at the end
1 cup sultanas, roughly chopped
2 heaped tablespoons cocoa powder
395g tin Nestle condensed milk
1 tablespoon rum

What to do

Place the finely crushed Weetbix in a large bowl with the coconut, cocoa powder and sultanas.

Make a well in the centre of the ingredients and pour in the condensed milk, making sure to scrape out the tin and not waste any. pour in the rum.

Mix very well with a wooden spoon. You should have a sticky mixture that comes together when pressed.

Take heaped teaspoon-sized balls of mixture. Using damp clean hands, roll the mixture into balls. Set aside on a tray.

Place the extra reserved coconut into a large plastic container. Place a few rum balls at a time into the container and roll them around to coat well in coconut. Repeat until all rum balls are coated.

Store in air-tight containers or in jars decorated with Christmas paper.

Enjoy in moderation. These are addictive.


Anzac Biscuits


Here's a quick bikkie recipe. These biscuits are great and although they are usually made in Australia around Anzac day in April, we made ours in December for an international cuisine day at school. I was lucky enough to be invited into the second grade class and give the children the story behind the creation of these biscuits back in the early 1900s. The children liked the biscuits and hopefully learnt something in the process.  If you want to learnt something about the story of Anzac Biscuits, visit here.

There's been a bit of debate in our house whether these biscuits are better 'chewy' or crunchy'.

It's crunchy all the way for me, so you'll get crunchy bikkies if you use this recipe.

What you'll need

Makes approximately 20 biscuits

1 1/4 cups plain flower
1 cup rolled oats (porridge oats)
1/2 cup brown sugar
2 1/2 tablespoons golden syrup
150g butter
3/4 cups desiccated coconut
1/2 teaspoon bicarb soda

What to do

Preheat your oven to 170 degrees. In a large bowl add the flour, oats, sugar and coconut and stir well to combine.

In a small saucepan add the golden syrup and the butter and heat over a low heat until melted together.
Remove from the heat and mix in the bicarb soda. Then also add 2 tablespoons water.

Pour the golden syrup into the dry ingredients and mix well until combined. The mixture should stick together a little, not be dry and crumbly. If dry, add a little more water.

Using a teaspoons full of mixture, roll into balls with slightly wet hands. Place on a lined baking tray. Flatten the balls slightly with your fingers.

Bake for 12 - 15 minutes until golden brown.

Once cooked, remove from the oven and cool completely before placing in an air-tight container for storage.

Monday, 26 November 2012

Banana cake with coconut and lime icing


'Can you bake a cake for an open day at the school?' I was asked. 'No problem,' I said. 'One slab of banana cake with coconut and lime icing, coming up!'


What you'll need

For the cake
2 large, overripe bananas, mashed
125g butter at room temperature (or slightly melted)
1 1/2 cups caster sugar
2 large eggs
1 tsp vanilla extract (or seeds from 1/2 vanilla pod)
100ml milk
1 1/2 cups (225g) self-raising flour
1/2 teaspoon bicarb soda

For the icing
1/2 cup shredded coconut
Juice and zest of one lime
1 1/2 cups icing sugar

Butter to grease the cake tin

What to do

Preheat your oven to 180 degrees Celsius. Grease the cake tin and line it with non-stick baking paper. I used a 20 x 20cm cake tin.

Place the butter, sugar, mashed banana, eggs and vanilla in a bowl and mix well. You can do this by hand or with electric beaters. Add the milk and mix to combine.

Add the flour and bicarb soda. Mix until combined. Pour the batter into a prepared tin and use a wooden spoon to smooth the batter and move it into all the corners of the pan. Bake for 40 minutes or until a skewer inserted into the cake comes out clean.

Cool in the tin for 15 minutes, then remove the cake to a wire rack to completely cool it.

Once cool, make the icing.  Pour the icing sugar into a bowl, squeeze the lime juice into the icing sugar, mixing as you go with a spoon. The consistency is right when the icing is the consistency of softened butter. It should not drip off the spoon, otherwise it will run off the cake. Add more icing sugar if the icing is too wet. If the icing is too dry, add warm water, a few drops at a time until you have the right consistency.

Spread icing over the cake, using a knife that has been heated under running, hot water. Once spread all over the cake (to the edges and down the sides if you want to), sprinkle over the coconut and the lime zest. Let the icing set for 10 minutes, then slice with a sharp knife. It will be easier to cut cleanly if you heat the knife under hot, running water before each slice.

This cake will store in an airtight container for three or four days. Alternatively you could slice the cake and then freeze to use in lunchboxes etc. Layering the individual cake slices between pieces of baking paper will make it easy to remove from the freezer, ensuring it won't stick to the other cake slices.

Corn and zucchini muffins

Continuing on with the zucchini theme of this week, I made a batch of these savoury muffins. They were super tasty and full of yummy vegetables.

Here's a funny story. I packed some off to school in the little people's lunchboxes. While they enjoyed the muffins, they reported that the other children in the class laughed because the muffins had corn in them. Apparently these children have never seen a savoury muffin, and thought I'd made sweet muffins with corn in them!  Gross is all I can say to that......

If you have trouble getting your children to eat their vegetables, I think foods like these muffins are a great idea. You can include lots of different vegetables, such as zucchini, corn, grated carrots, peas, chickpeas, tomatoes, sweet potato or pumpkin in the mix, flavour with some herbs and cheeses and you have a yummy and nutritious snack that easily fits in the lunchbox or can be served for lunch or as a party snack.

In addition to lunch boxes for school, we had these warmed up for lunch served with some salads. And I left a plate of these muffins on the kitchen bench for afternoon tea snacking also. They didn't last long!

I think these muffins would also freeze well, so you could make a double batch for eating later on. I mention freezing foods as I've been seeing a bit online lately about new Mums struggling to cook/eat nutritious meals. Foods like these muffins can be defrosted easily with a quick zap in the microwave and importantly, can be eaten with one hand while nursing, rocking, feeding babies. Thinking of all you new Mums out there.

What you'll need

Made 16 medium-sized muffins

1 large zucchini, grated and extra juice removed
1 medium onion, grated
300g tin corn cornels
1 cup self-raising flour
1 cup instant polenta
2 eggs
1 1/2 cups milk
1 cup grated cheese, I used gouda
8 cherry tomatoes, sliced in half
1/2 cup shredded ham
1 table dried thyme
Salt and pepper

What to do

Preheat your oven to 180 degrees.

Mix all ingredients in a large bowl, excluding the tomato, ham and thyme. Season well. You should have a thick mixture, but it should be wet. If not, add a little more milk or water to the mixture. If very runny, add a but more flour until the consistency is right.

Spoon the mixture into well-greased muffin cases. Sprinkle over a little bit of ham, press a half cherry tomato into the top of the muffin and sprinkle with a little of the dried thyme.

Bake in the oven for approximately 30 minutes. Insert a wooden skewer into some of the muffins, and if it comes out clean, the muffins are ready. If the skewer comes out with wet batter on it, bake for at least another 10 minutes and test again.  Once ready, remove the muffins from the oven and let cool
on a wire rack. Serve warm or let cool completely for lunchboxes or freezing. If freezing, store in an air-tight container.

Saturday, 17 November 2012

Gyoza (Japanese dumplings)


These little parcels are rather addictive. They are gyoza, or Japanese dumplings. I could sit down and eat a whole plate full and the little people are rather fond of them also. 

I prefer steamed gyoza but the 'pot-sticker' variety cooked in a frying pan and then steamed are also wonderful. The slippery wrappers are so yummy, and you can fill the gyoza with anything you like. The version above was made with minced prawns and some miso paste. But gyoza work really well with other seafoods such as scallops, minced chicken or pork and even vegetables such as sweet potato. 

The best part about this recipe is most of the hard work is done for you; the wrapper pastry is super cheap and can be found at any Asian shop or many supermarkets. All you have to do is whip up a bit of filling, squish the pastry together with a little water, then steam. Only problem is that you can never make enough; my family always want more!

This is an impressive dish to serve at a dinner party. You can prepare the gyoza beforehand and keep them in an air-tight container in the freezer until ready to cook. Your guests will think you are a super-chef! 

What you'll need

Serves six people as an entree, makes 30 gyoza
200g minced green prawn meat
1 tablespoon red miso paste, thinned with a teaspoon of warm water to make a thick paste


1 packet gow gee wrappers, containing 30 wrappers

What to do

Prepare the filling. Mix the miso paste with the prawn meat in a bowl.
Set aside. Place a clean tea towel on your work surface.

Open the packet of gow gee wrappers and peel off, one at a time. Be gentle, as the wrappers are fragile and can stretch and rip (which you don't want). Place the wrappers on your tea towel. (If you can't fit them all, place out half then do the rest later.)

Working quickly (or they will dry out), place 1 teaspoon of mixture into the centre of each wrapper. Once this is done, fill a small bowl with warm water. Dip your finger into the water and then run it around the edge of the wrapper.

Now fold the wrapper in half around the filling and seal it together (see picture right). It will seal where you have wet it. You can now cook the gyoza straight away or place them in an air tight container and put in the freezer until you are ready to cook. From experience, I think the gyoza stay together better if you put them in the freezer for at least an hour before cooking.


Cooking tips: You can steam the gyoza in a steamer basket (as below), but you MUST grease the basket with some vegetable oil first, or the gyoza will stick very well to the basket. Steam for five minutes and serve immediately while hot.

You could also fry the gyoza in a little vegetable oil in frying pan over medium heat. Once they are brown on one side, pour in a cup of warm water, replace the lid and remove from the heat. The gyoza will then steam in the heat of the pan. Leave for 3 minutes, drain, then serve immediately.

Storage tips: Layer the gyoza between layers of baking paper or greaseproof paper in an air tight container with a lid. When layering, make sure you leave a little space between each gyoza, or else they will stick together. I prefer to make and cook these on the same day, but you could keep them for up to a week.

Dipping sauce tips: Serve with a dipping sauce made from soy sauce with a squeeze of fresh lime juice and some wasabi.

Sunday, 7 October 2012

Antipasto.... or a little snack


Here's a little something we ate last night with a cold glass of Italian prosecco. It was a little bit too early to cook dinner and too late for something heavier than a few tasty asparagus tossed in the pan, some salty cheese and beautiful fresh tomato.

This was quick and easy, and it was devoured by the little and big people. You could say it was our little weather celebration. Yesterday was hot here, but today I think that Autumn has really arrived. Time to get out the winter clothes and shoes I think!

Make this for friends. Give them each a fork, a serviette and a glass of wine and say,'Dig in!' You could call it a 'deconstructed' salad, although that is a fairly 'wanky' term. Alternatively, serve it with a bit of crusty bread for a light lunch or even dinner.

What you'll need


Serves four as a snack.

I bunch of asparagus, woody stems trimmed.
2 large, vine-ripened tomatoes, thickly sliced
1 x 200g packet haloumi cheese, sliced into fingers
Juice of one lemon
Salt and pepper
1 tsp olive oil to grease the pan


What to do


Place a pan over high heat. Add the olive oil. Add the asparagus to the pan and cook, turning frequently for about five minutes, or until the asparagus is starting the become soft and slightly browning. Remove from the pan.

Add the haloumi and cook for five minutes, turning once when it is brown on one side.

Arrange the tomato, asparagus and cheese on a plate, sprinkle with a little salt and freshly-ground pepper and squeeze over the lemon juice. Serve while the cheese and asparagus are still hot.

Friday, 17 August 2012

Sausage rolls


The little people and I whipped up these sausage rolls in 10 minutes, and dinner was on the table half an hour later.

This was 'spur of the moment' cooking. We are going away for a week's holiday, so I have let the fridge run down. I thought I had some lasagna in the freezer that I was going to defrost for the little people, but someone must have eaten it!

I had some beef mince, so I popped across the road to the convenience store from some shortcrust pastry, and there you have it - sausage rolls.

These looked impressive baking in the oven, tasted great and were a hit with the children. These would be great as a Sunday afternoon footy snack, served at the children's party, school lunchboxes, or even as an easy weekend lunch, with some salad.

What you'll need

*This recipe made three large sausage rolls, which I sliced into eight smaller pieces each, so about 24 small sausage rolls. 

500g beef mince
2 eggs
1/2 cup dry breadcrumbs
1/2 tsp each dried thyme and dried rosemary
1 clove garlic, minced
1 tbl Worcestershire sauce
20 g melted butter
Salt and pepper

275g packet shortcrust pastry, approximately 45cm x 25cm. Pastry sliced into three sections, 15cm wide.

What to do


Preheat the oven to 180 degrees Celsius.

Mix mince with breadcrumbs, herbs, eggs and garlic. Season well with salt and pepper.

Lay out the pastry on a lined baking tray. Cut it into three sections, 15cm wide. Spoon one third of the mince into the middle of the pastry, then spread it out with your fingers so that you have a long 'sausage' of mince running down the center of the pastry, from top to bottom. This is a great job for little people.


Fold each side of the pastry into the middle over the mince, and join at the top. I just squished the pastry together with my fingers to join it together.

Using a pastry brush, paint some melted butter into each roll to help the pastry brown. I sprinkled the rolls with some dried thyme and some salt.

Place in the oven and bake for 25 minutes.

Once brown, remove from the oven and let cool for five minutes. Slice with a sharp knife into whatever size you'd like.

Serve with tomato sauce (of course) and some salad for a meal or by themselves for a snack.


Monday, 6 August 2012

Quesadillas

Here is an easy, quick and healthy lunch or dinner for the whole family.

Quesadillas - basically a Mexican version of a toasted sandwich - is super-quick to make with a few ingredients from the pantry and fridge.

I like to keep a packet of tortillas in the pantry; it is a great ingredient for emergency late dinners and snacks, and even for the school lunchbox.

There have been times on a Sunday evening, realising that I have no bread in the house, that a packet of tortillas has been a life-saver!

Today we ate ours around the coffee table while watching very fit people run fast at the Olympics. Almost made me want to go for a jog - almost!

I made my quesadillas with a ham and cheese filling, but you could many other combinations such as left-over taco mince and cheese, sliced chicken breast, cheese and tomato, vegetarian with grilled eggplant, zucchini and capsicum and some feta. Enjoy experimenting with your favourite combinations.

What you'll need

*Makes 4 quesadillas, which you can then slice into quarters or eights. This is enough for 3 or 4 people for lunch.

1 packet medium tortillas, containing 8 tortillas
150g grated cheese - I used Gouda
12 slices ham - I used three slices on each quesadilla

1 ripe avocado
100g natural yogurt or sour cream
Salt and pepper


What to do

Heat a non-stick frying pan over medium heat.

You do not need any oil in the pan as you are only toasting the tortillas.

Place one tortilla on the base of the pan. Working quickly, sprinkle a handful of cheese onto the tortilla and spread to the edges evenly. Place three ham slices onto the cheese, making sure that the ham covers the cheese and covers to the edge if possible. Place another tortilla on the top and squish the it all together with an egg flip.

Cook for one or two minutes, then flip it over and cook for the same on the other side. Be careful not to leave it too long, otherwise it will be rather brown!

Remove from the pan, and cut into slices with a shape knife. Serve immediately while it is still crunchy and hot.

Repeat with the other ingredients, serving them immediately. You can ask the little people of the house to act as 'quesadilla runners' to and from the kitchen.

Serve with mashed avocado, simply seasoned with a little salt and pepper, and a dish of sour cream.

Saturday, 14 July 2012

Nachos

This week, we are having a 'kid's request' week in the kitchen.

We are away from home for a short holiday and it is school holidays so we are doing things a bit different this week.

When we've been to the supermarket this week, the kids have been able to choose what we are going to eat. This has been with a small amount of guidance from me, as my children would eat pasta every single night of the week otherwise. And as much as I like pasta, once a week is enough for me.

Today, the kid's choice was nachos. This is a great kids meal as you can fill it full of vegetables, and if you choose your ingredients carefully it is relatively healthy. You can also easily make this a vegetarian meal by leaving out the meat and substituting other vegetables.


What you'll need


*Serves 3 or 4 as a light meal.

400g beef mince
400g tomato pieces, tinned
400g kidney beans, tinned
1 packet Taco seasoning
1/2 cup water

1 ripe avocado, mashed
200ml sour cream or natural yoghurt
2 cups rocket or baby spinach
1 cup grated mozzarella or cheddar cheese
500 natural corn chips, salt-reduced if possible


What to do


Heat a large frying pan over medium heat. Add the mince and cook until brown. Add the taco seasoning to the pan, mix well through the mince. Add the tomatoes and kidney beans. Mix well. Add the water, stir, reduce heat to low, then simmer for 20 minutes. Season to taste if necessary. I think that the sauce needs to be a little wet, so that some juice soaks into the corn chips. If you're sauce is too dry, add a little more warm water. Remove from heat and set aside.

Scoop the avocado from the shell and mash in a bowl.

Assemble the nachos. Place the corm chips on a large platter. Spoon over as much or little of the meat sauce as you like, but spread it well over the corn chips. Sprinkle with cheese. At this stage you can put the nachos into the oven under a hot grill and melt the cheese slightly. I didn't add cheese this time as I wanted a less heavy dish, and also I completely forgot to add it, but the nachos were still really yummy.

Once cheese is melted, remove from oven, then spoon over avocado and sour cream/yoghurt.

Serve immediately with a cold beer if you're a grown-up or a cold water if you're little.