Pages

Saturday, 15 December 2012

Rum Balls

Ok, it's Christmas. So here are the start of the festive recipes.

Rum balls have a great tradition in our family. There was always a big bowl of them on every Christmas morning breakfast table or at Christmas parties during December. I really love them, especially the condensed milk, which I have a slight addiction to. I am rather proud to say that I've passed the addiction onto my kids!

We have always made run balls with crushed Weetbix being the main ingredient. I now see rum ball recipes made with crumbled Christmas cake or chocolate cake. Sorry folks, but it's not the same. Weetbix versions are way better in my opinion.

You can make rum-free versions for the little ones if you like, but I feel that there is such a small amount of alcohol in each rum ball that it is really not necessary. And the rum flavour is really what makes these special. But it is up to you.

I like to make several batches of rum balls and then package them up in glass jars to give as gifts. Best to get them all out of the house otherwise they all get eaten up! 

Merry Christmas. 

What you'll need

Makes 20 - 30 small rum balls

9 Weetbix, finely crushed
1/2 cup desiccated coconut, plus 1 cup extra coconut to roll at the end
1 cup sultanas, roughly chopped
2 heaped tablespoons cocoa powder
395g tin Nestle condensed milk
1 tablespoon rum

What to do

Place the finely crushed Weetbix in a large bowl with the coconut, cocoa powder and sultanas.

Make a well in the centre of the ingredients and pour in the condensed milk, making sure to scrape out the tin and not waste any. pour in the rum.

Mix very well with a wooden spoon. You should have a sticky mixture that comes together when pressed.

Take heaped teaspoon-sized balls of mixture. Using damp clean hands, roll the mixture into balls. Set aside on a tray.

Place the extra reserved coconut into a large plastic container. Place a few rum balls at a time into the container and roll them around to coat well in coconut. Repeat until all rum balls are coated.

Store in air-tight containers or in jars decorated with Christmas paper.

Enjoy in moderation. These are addictive.


Anzac Biscuits


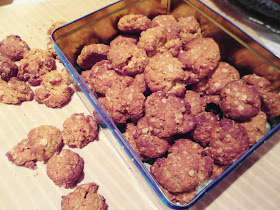
Here's a quick bikkie recipe. These biscuits are great and although they are usually made in Australia around Anzac day in April, we made ours in December for an international cuisine day at school. I was lucky enough to be invited into the second grade class and give the children the story behind the creation of these biscuits back in the early 1900s. The children liked the biscuits and hopefully learnt something in the process.  If you want to learnt something about the story of Anzac Biscuits, visit here.

There's been a bit of debate in our house whether these biscuits are better 'chewy' or crunchy'.

It's crunchy all the way for me, so you'll get crunchy bikkies if you use this recipe.

What you'll need

Makes approximately 20 biscuits

1 1/4 cups plain flower
1 cup rolled oats (porridge oats)
1/2 cup brown sugar
2 1/2 tablespoons golden syrup
150g butter
3/4 cups desiccated coconut
1/2 teaspoon bicarb soda

What to do

Preheat your oven to 170 degrees. In a large bowl add the flour, oats, sugar and coconut and stir well to combine.

In a small saucepan add the golden syrup and the butter and heat over a low heat until melted together.
Remove from the heat and mix in the bicarb soda. Then also add 2 tablespoons water.

Pour the golden syrup into the dry ingredients and mix well until combined. The mixture should stick together a little, not be dry and crumbly. If dry, add a little more water.

Using a teaspoons full of mixture, roll into balls with slightly wet hands. Place on a lined baking tray. Flatten the balls slightly with your fingers.

Bake for 12 - 15 minutes until golden brown.

Once cooked, remove from the oven and cool completely before placing in an air-tight container for storage.

Monday, 26 November 2012

Creamy prawn and avocado pasta


I think I should have made a very large pot of this dish. It was so, so tasty that the man of the house and I polished it all off and were looking for more.

My inspiration was a packet of frozen green prawns. The rest of the ingredients were already in the fridge.

The creamy sauce and big, plump prawns stuck nicely to the flat ribbons of papardelle. And the hint of fresh chilli and basil lifted the sauce so it was not to heavy.

I'll be making this one again, for sure.

What you'll need

Served two, with no leftovers!

200g packet frozen, peeled, green prawns
1 brown onion, finely chopped
2 cloves garlic, minced
2 fresh red chillis, finely chopped
1 tablespoon Dijon mustard
1 cup pouring cream
1 medium avocado, peeled and sliced
2 teaspoon vegetable oil
Handful fresh basil, torn into small pieces
Handful of fresh Parmesan cheese, finely grated

Fresh cooked pasta to serve.

What to do


Heat one teaspoon of the oil in a large frying pan. Once hot, add the onion and garlic. Reduce the heat to medium, stirring constantly. You don't want the onion and garlic to colour, just soften. Once soft, remove from the pan to a bowl and set aside.

Increase the heat to high. Add a little more oil to the pan. Add the prawns and saute over high heat, until pink. This should take about 5 minutes. Reduce the heat to low. Once much of the heat has gone out of the pan, add the onion mix back into the prawns. Stir in the mustard and chillis. Remove the pan from the heat. Now add the cream and stir well into the other ingredients. 

While the sauce is still hot, mix through or spoon over cooked pasta. I used parpardelle. Top with sliced avocado, torn basil leaves and cheese. Simply delicious!

Banana cake with coconut and lime icing


'Can you bake a cake for an open day at the school?' I was asked. 'No problem,' I said. 'One slab of banana cake with coconut and lime icing, coming up!'


What you'll need

For the cake
2 large, overripe bananas, mashed
125g butter at room temperature (or slightly melted)
1 1/2 cups caster sugar
2 large eggs
1 tsp vanilla extract (or seeds from 1/2 vanilla pod)
100ml milk
1 1/2 cups (225g) self-raising flour
1/2 teaspoon bicarb soda

For the icing
1/2 cup shredded coconut
Juice and zest of one lime
1 1/2 cups icing sugar

Butter to grease the cake tin

What to do

Preheat your oven to 180 degrees Celsius. Grease the cake tin and line it with non-stick baking paper. I used a 20 x 20cm cake tin.

Place the butter, sugar, mashed banana, eggs and vanilla in a bowl and mix well. You can do this by hand or with electric beaters. Add the milk and mix to combine.

Add the flour and bicarb soda. Mix until combined. Pour the batter into a prepared tin and use a wooden spoon to smooth the batter and move it into all the corners of the pan. Bake for 40 minutes or until a skewer inserted into the cake comes out clean.

Cool in the tin for 15 minutes, then remove the cake to a wire rack to completely cool it.

Once cool, make the icing.  Pour the icing sugar into a bowl, squeeze the lime juice into the icing sugar, mixing as you go with a spoon. The consistency is right when the icing is the consistency of softened butter. It should not drip off the spoon, otherwise it will run off the cake. Add more icing sugar if the icing is too wet. If the icing is too dry, add warm water, a few drops at a time until you have the right consistency.

Spread icing over the cake, using a knife that has been heated under running, hot water. Once spread all over the cake (to the edges and down the sides if you want to), sprinkle over the coconut and the lime zest. Let the icing set for 10 minutes, then slice with a sharp knife. It will be easier to cut cleanly if you heat the knife under hot, running water before each slice.

This cake will store in an airtight container for three or four days. Alternatively you could slice the cake and then freeze to use in lunchboxes etc. Layering the individual cake slices between pieces of baking paper will make it easy to remove from the freezer, ensuring it won't stick to the other cake slices.

Corn and zucchini muffins

Continuing on with the zucchini theme of this week, I made a batch of these savoury muffins. They were super tasty and full of yummy vegetables.

Here's a funny story. I packed some off to school in the little people's lunchboxes. While they enjoyed the muffins, they reported that the other children in the class laughed because the muffins had corn in them. Apparently these children have never seen a savoury muffin, and thought I'd made sweet muffins with corn in them!  Gross is all I can say to that......

If you have trouble getting your children to eat their vegetables, I think foods like these muffins are a great idea. You can include lots of different vegetables, such as zucchini, corn, grated carrots, peas, chickpeas, tomatoes, sweet potato or pumpkin in the mix, flavour with some herbs and cheeses and you have a yummy and nutritious snack that easily fits in the lunchbox or can be served for lunch or as a party snack.

In addition to lunch boxes for school, we had these warmed up for lunch served with some salads. And I left a plate of these muffins on the kitchen bench for afternoon tea snacking also. They didn't last long!

I think these muffins would also freeze well, so you could make a double batch for eating later on. I mention freezing foods as I've been seeing a bit online lately about new Mums struggling to cook/eat nutritious meals. Foods like these muffins can be defrosted easily with a quick zap in the microwave and importantly, can be eaten with one hand while nursing, rocking, feeding babies. Thinking of all you new Mums out there.

What you'll need

Made 16 medium-sized muffins

1 large zucchini, grated and extra juice removed
1 medium onion, grated
300g tin corn cornels
1 cup self-raising flour
1 cup instant polenta
2 eggs
1 1/2 cups milk
1 cup grated cheese, I used gouda
8 cherry tomatoes, sliced in half
1/2 cup shredded ham
1 table dried thyme
Salt and pepper

What to do

Preheat your oven to 180 degrees.

Mix all ingredients in a large bowl, excluding the tomato, ham and thyme. Season well. You should have a thick mixture, but it should be wet. If not, add a little more milk or water to the mixture. If very runny, add a but more flour until the consistency is right.

Spoon the mixture into well-greased muffin cases. Sprinkle over a little bit of ham, press a half cherry tomato into the top of the muffin and sprinkle with a little of the dried thyme.

Bake in the oven for approximately 30 minutes. Insert a wooden skewer into some of the muffins, and if it comes out clean, the muffins are ready. If the skewer comes out with wet batter on it, bake for at least another 10 minutes and test again.  Once ready, remove the muffins from the oven and let cool
on a wire rack. Serve warm or let cool completely for lunchboxes or freezing. If freezing, store in an air-tight container.

Friday, 23 November 2012

Zucchini and cottage cheese cakes


Here are some delightful little 'cakes' that we had for brunch last weekend. I had a large bag of zucchinis (courgettes) in the fridge and I wanted to use them up, but in a way that our guests and the little people would enjoy. The result was zucchini and cottage cheese cakes. The zucchini gave these cakes a lovely lightness and the cottage cheese provided a wonderful tang. I served them warm with bacon, grilled tomatoes, chopped avocado and toast along with some other brunchy things. It was yummy and worth skipping breakfast for.

What you'll need

Makes 30 medium-sized cakes

2 x medium zucchinis, grated and drained of 'juice'
4 eggs, separated
1/2 cup self-raising flour
1/2 cup milk
1 3/4 cups cottage cheese
1 cup grated cheese (I used gouda)
2 tablespoons chopped chives or eschallots
Salt and pepper
Butter for frying

What to do


Place egg yolks, flour and milk in a bowl and mix until smooth.

Add the zucchini, cottage cheese, grated cheese, chives/eschallots and season well with salt and pepper. Stir well to combine.

Place the eggwhites in a large bowl and beat with electric beaters until they are stiff. Gently fold through the zucchini mixture.

Heat a frying pan (I used two at the same time) over medium heat. Add a teaspoon of butter and melt until it is foamy. Dallop in tablespoons of the mixture. Cook until you see bubbles rising on one side of the cakes, then flip and cook the other side. Both sides should be golden brown. Cook in batches, keeping the cakes in a warm oven.

Serve warm with bacon, roasted tomatoes and some chopped avocado. Delicious!

Monday, 19 November 2012

Roasted eggplant and pumpkin with feta and lemon


Oh, this dish was just so delicious!

We've been eating lots of pumpkin lately as it is pumpkin season right now and it is abundant. I thought this combination with sweet pumpkin, silky eggplant, creamy feta, and the tartness of lemon juice was wonderful. You could make up a huge platter of this for a bbq or family feast. Yum!

I served this as a part of a vegetable banquet, no meat on the table. The only reason for this was that we had lots of vegetables and salad ingredients in the fridge that needed to be used. I promise you I am NOT turning into a vegetarian - I simply love meat too much. But we all really enjoyed the dishes and felt lovely and full afterwards.

What you'll need

Served four as a side dish, with leftovers.

2 medium eggplants, sliced into wedges (I cut each eggplant into 6 wedges)
Half a medium-sized butternut pumpkin, skin on, cut into wedges the same size as the eggplant (10 wedges)
1 tablespoon olive oil
200g packet feta cheese, crumbled
Juice of 1 lemon
1 red onion, 1 brown onion, sliced into rings
1 clove garlic, minced
2 tablespoons olive oil (some for frying the onions, some for basting the vegetables)
Salt and pepper

What to do


Heat the oven to 180 degrees.

On a large lined baking tray, place the wedges of pumpkin and eggplant, skin-side down. Using a basting brush, paint all the pieces with olive oil. Season well with salt and pepper.

Bake for approximately 30 - 40 minutes, or until the pumpkin and eggplant are browning and soft.
Remove from the oven and set aside.

While the eggplant and pumpkin are baking, in a pan, fry the onions over medium to low heat with a little olive oil. Add the garlic and fry until everything is soft and golden - about 10 minutes. Set aside to cool slightly.

Assemble the dish.

Arrange the pumpkin and eggplant wedges on a platter. Spoon over the fried onions and then sprinkle with feta cheese. Finally, squeeze the lemon juice over the top, then serve while warm.

I think you could eat this dish by itself with some crusty bread and a salad. Or serve it as a side dish to roasted chicken or lamb. I would have loved to sprinkle some sumac over the top of this dish, but I cannot find it in Vienna yet. I will have to keep hunting.

Asian pork roast


I had a boneless pork shoulder roast in the freezer, but I wanted to do something a bit different to the normal roast meat, vegetables and gravy. Not that a normal roast isn't delicious, but sometimes my palette craves something out of the ordinary. 

I think the man of the house would have preferred a 'normal' roast dinner as described above, but I think he enjoyed this Asian inspired version as well.

There were three parts to this meal; roasted pork with miso glaze, pumpkin and sweet potato mash with coconut milk and ginger, and steamed broccoli and beans with garlic and soy.

The recipes for all three dishes are below.

What you'll need

Serves four for dinner with leftovers.

For the roast pork
1.5 - 2kg rolled boneless pork shoulder (usually sold in an elastic bandage for cooking)
3 tablespoons miso paste (loosened with 1 tablespoon of warm water to make a wet paste)
Salt and pepper
1 tablespoon of oil

For the pumpkin and sweet potato mash
400g sweet potato, peeled and chopped into pieces
300g pumpkin, peeled, de-seeded and chopped into pieces (same size pieces as the sweet potato)
100ml coconut milk
50g butter
Salt and pepper
1 tablespoon grated fresh ginger

For the vegetables
Handful fresh beans, topped and tailed
2 cups broccoli florets
2 cloves garlic, finely sliced
1 tablespoon soy sauce
1 teaspoon vegetable oil

What to do

Preheat the oven to 180 degrees. Prepare the meat, rubbing all over with oil. Season with salt and pepper.

Brush on (with your fingers or a pastry brush) the miso paste, leaving a thick coating all over the meat. Reserve approximately 1 tablespoon of the miso paste mixture for reapplying during the cooking process.

Cover your baking dish with foil and bake the pork for approximately 60 minutes. Remove the pork from the oven and paint on the rest of the reserved miso paste. Place back in the oven without the foil for 20 minutes to finish the cooking process and colour the miso glaze.

Remove from the oven, cover with foil again and set aside for at least 10 minutes to rest before you carve it.

Once rested, carefully remove the elastic bandage with scissors, then thinly carve the meat, placing it onto a serving plate. Keep covered with foil in the warm oven until ready to serve to the table.

About half way through the cooking of the meat, begin making the sweet potato mash. First, place the sweet potato and pumpkin in water, bring to the boil and boil until all is tender (use a knife inserted into the largest piece to check). Drain well. Return to the cooking pot. Add the butter, coconut milk, ginger and season well. Using a potato masher or electric beaters, mash/puree until smooth. Place a lid on the pot to keep it warm and set aside for serving. When ready to serve to the table, spoon into a serving dish.

For the vegetables, boil a large pot of water, once boiling, add the broccoli. After 1 minute of cooking, add the beans. Cook for approximately 2 more minutes, then drain and refresh under cold running water. Heat a frying pan over high heat. Add the garlic and fry for 30 seconds. Now add the broccoli and beans. Stir for one minutes, or until the garlic goes brown. Remove from the heat, serve the vegetables onto a serving plate and drizzle over the soy sauce. Serve while hot.

I like to serve my roasts to the table on serving platters, so everyone can help themselves to extra if they want. But alternatively, you could serve this out onto plates in the kitchen.

Either way, this is a refreshing twist on a traditional pork roast. Enjoy!


Saturday, 17 November 2012

Salmon, spinach and feta parcels


Sometimes I get a bit bored with fish. I like it crumbed, but it's not so healthy to eat it like that all the time. I like it grilled, but sometimes that's a bit mmeehh too! 

So here's a recipe I came up with to jazz up some salmon fillets I had in the freezer. The result was rather good; flaky pastry, creamy melted feta cheese on top of moist salmon and tasty pureed spinach. I made a large batch, so we had this for dinner two nights running with simple steamed vegetables and salad. It made a nice change. No more boring fish nights here!

What you'll need

Serves eight for dinner

2 x sheets puff pastry (approx 40cm x 30cm)
200g feta cheese, crumbled
2 cups spinach puree (I used a block of defrosted frozen spinach puree). If you spinach is very watery, make sure you drain it through a fine sieve, otherwise it will make your parcel soggy. Alternatively you could just use chopped, fresh spinach that's been blanched  in boiling water and drained well.)
300g boneless salmon fillets
Melted butter for brushing the pastry

Fresh lemon, vegetables or salad to serve.

What to do

Place one sheet of the pastry on a clean work surface. Pour one cup of spinach down the middle of the pastry length-ways (see picture). Using half the salmon, place in slices on top of the spinach. Top with half the crumbled feta cheese.       
                                               
Now fold each side of the overhanging pastry over the ingredients, into the middle. Crimp together with your fingers. Fold over and crimp each end together to seal the pastry package. Repeat with the leftover ingredients to make two identical pastry parcels.

Place the pastry parcels onto a baking tray lined with baking paper. Brush each parcel liberally with melted butter.

Bake in a hot over at 180 degrees for 30 minutes, or until the pastry is golden.
Remove from the oven. Slice immediately and serve with vegetables or salad of your choice. Serve with fresh lemon to squeeze.

Spicy chickpeas


This is a filling and warming recipe for a weekend lunch or a quick weeknight dinner. It can be made easily with a few canned ingredients from the pantry. I sometimes make this chickpea dish mid-morning, so when little hungry people come home from school, there is something hot, filling and nutritious ready to go.

What you'll need

Serves four for lunch

400g can chickpeas, drained
400g tinned chopped tomatoes
1 packet taco seasoning
1 medium onion, diced
Half a ripe avocado, diced
1 cup grated cheese
1 tablespoon vegetable oil

Steamed rice and fresh lime to serve

What to do

In a large saucepan, heat the oil over medium heat. Add the onion and saute until transparent. Add the taco seasoning and mix well with the onion. Fry for 2 minutes. Add the chickpeas and the tomatoes and mix well. The mixture should be quite wet/runny and easy to stir. If not, add a cup of water and stir well.

Reduce the heat to low and simmer without a lid for 30 minutes, stirring frequently. If the mixture gets to dry and thick, add a bit more water. Season to taste with salt and pepper. If you'd like some more spice, you could also add some chilli powder or fresh chilli.

Serve hot over steamed rice. Sprinkle with some diced avocado, grated cheese and a squeeze of lime.

Gyoza (Japanese dumplings)


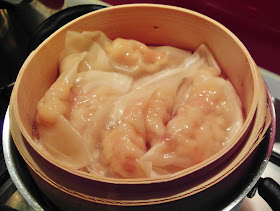
These little parcels are rather addictive. They are gyoza, or Japanese dumplings. I could sit down and eat a whole plate full and the little people are rather fond of them also. 

I prefer steamed gyoza but the 'pot-sticker' variety cooked in a frying pan and then steamed are also wonderful. The slippery wrappers are so yummy, and you can fill the gyoza with anything you like. The version above was made with minced prawns and some miso paste. But gyoza work really well with other seafoods such as scallops, minced chicken or pork and even vegetables such as sweet potato. 

The best part about this recipe is most of the hard work is done for you; the wrapper pastry is super cheap and can be found at any Asian shop or many supermarkets. All you have to do is whip up a bit of filling, squish the pastry together with a little water, then steam. Only problem is that you can never make enough; my family always want more!

This is an impressive dish to serve at a dinner party. You can prepare the gyoza beforehand and keep them in an air-tight container in the freezer until ready to cook. Your guests will think you are a super-chef! 

What you'll need

Serves six people as an entree, makes 30 gyoza
200g minced green prawn meat
1 tablespoon red miso paste, thinned with a teaspoon of warm water to make a thick paste


1 packet gow gee wrappers, containing 30 wrappers

What to do

Prepare the filling. Mix the miso paste with the prawn meat in a bowl.
Set aside. Place a clean tea towel on your work surface.

Open the packet of gow gee wrappers and peel off, one at a time. Be gentle, as the wrappers are fragile and can stretch and rip (which you don't want). Place the wrappers on your tea towel. (If you can't fit them all, place out half then do the rest later.)

Working quickly (or they will dry out), place 1 teaspoon of mixture into the centre of each wrapper. Once this is done, fill a small bowl with warm water. Dip your finger into the water and then run it around the edge of the wrapper.

Now fold the wrapper in half around the filling and seal it together (see picture right). It will seal where you have wet it. You can now cook the gyoza straight away or place them in an air tight container and put in the freezer until you are ready to cook. From experience, I think the gyoza stay together better if you put them in the freezer for at least an hour before cooking.


Cooking tips: You can steam the gyoza in a steamer basket (as below), but you MUST grease the basket with some vegetable oil first, or the gyoza will stick very well to the basket. Steam for five minutes and serve immediately while hot.

You could also fry the gyoza in a little vegetable oil in frying pan over medium heat. Once they are brown on one side, pour in a cup of warm water, replace the lid and remove from the heat. The gyoza will then steam in the heat of the pan. Leave for 3 minutes, drain, then serve immediately.

Storage tips: Layer the gyoza between layers of baking paper or greaseproof paper in an air tight container with a lid. When layering, make sure you leave a little space between each gyoza, or else they will stick together. I prefer to make and cook these on the same day, but you could keep them for up to a week.

Dipping sauce tips: Serve with a dipping sauce made from soy sauce with a squeeze of fresh lime juice and some wasabi.

Scrambled eggs


For a quick and super-yummy weekend breakfast, try these delicious scrambled eggs. Treat your eggs very gently when preparing and cooking and you'll be rewarded with a deliciously soft and scrumptious meal. The sour cream or natural yoghurt makes the eggs just that little more rich in this recipe.

What you'll need

Serves 3 - 4 people

6 large eggs
100g bacon or prosciutto, finely diced
1/2 cup sour cream or natural yoghurt
Salt and pepper

Fresh basil, grated cheese and toast to serve

What to do

Heat a large non-stick frying pan over medium heat.

Crack the eggs into a bowl, add the sour cream/yoghurt and chopped meat and gently whisk. Season well with salt and pepper. I leave my egg mix a little lumpy; I do not incorporate all the yolk into the whites. This makes for better colour and texture when serving I think.

Pour the mixture into the pan and reduce the heat to low. Using an egg flip or straight-edged wooden spoon, gently scrape the cooked egg from the bottom of the pan and move to the side of the frying pan. The uncooked egg mixture will then run into the bottom of the pan. Repeat a few times until the cooked egg is to the side and the uncooked egg fills in the holes. Cook for approximately 3 to 4 minutes.

While the eggs are still quite runny and wet-looking, remove from the heat and set aside. The eggs will keep cooking. Removing the eggs from the heat before they are fully cooked will ensure they are not too dry.

Gently spoon onto prepared plates with buttered toast. Sprinkle with grated cheese of your choice and some fresh basil. Serve while warm.

Monday, 5 November 2012

Steamed jam pudding


For me, a steamed pudding is a real 'comfort food' recipe. I remember eating steamed puddings as a kid, but I can't remember who it was that made it for me - perhaps Great Grandmother or Grandmother or Auntie.

I think there is nothing quite like sitting down to a warm, sweet pudding that's been steaming on the stove all afternoon. The texture of the sponge is very different to a baked pudding and the hot topping makes everything sticky and sweet. And served with some custard, cream or icecream makes this so luscious.

This recipe is also a great way to use up those half-used bottles of jams and preserves at the back of the fridge. Mix them all together for a lovely flavour combination. Or if you like, add some tinned fruit to the jam mix for some extra texture and flavour.

The recipe I used for this pudding came from BBC Good Food Magazine (UK edition), November edition pp121. This is an excellent magazine, with lots of creative and delicious recipes. The Australian edition of this magazine is excellent as well.

I found the recipe to be spot on, apart from the cooking time. My pudding only took 90 minutes to cook. The sponge part of the pudding was wonderfully moist, and the jam on top was lovely, sticky and sweet.
I served ours with some marscapone cream and a small dallop of lemon curd - what I had in the fridge basically.

On the first night we ate this, the pudding was still warm from cooking. On the subsequent nights, I heated it for 20 seconds or so in the microwave oven, then spooned over the cream. Delish!!


What you'll need

Serves 6 - 8 people

For the topping:
4 heaped tablespoons of whatever jam/conserve you have. I used a homemade strawberry jam. You could also use golden syrup or treacle. If you want to use tinned fruit, you'll need about 200g, drained and roughly chopped.

For the pudding:
175g softened butter
175g caster sugar
175g self-raising flour
3 large eggs
2 tbls milk
1 tsp vanilla extract (I used beans from a quarter dried vanilla pod)


What to do

1. Grease a pudding basin with butter and pour the jam (or whatever you are using as the topping) into the bottom. I don't have a pudding basin, so I used a small ceramic salad bowl instead. It will need to have a capacity of 1 - 1.5L.

2. Boil a kettle full of water. In the bottom of a large and deep saucepan place a upturned bowl. The bowl should fit well into the bottom of the saucepan and also should be big enough to hold the pudding basin.  

3. Place all the pudding ingredients into a bowl and mix for 2 minutes with an electric mixer. Scrape the mixture into the pudding basin.

4. Make a lid for the pudding basin from a piece of baking paper and foil. Place a large piece of baking paper over a large piece of foil, approximately 60cm x 40cm. Grease the baking paper. Then make a pleat (fold, then fold back, see picture above) through both sheets. Use about 5cm of the paper for the pleat. This will give the lid some room to move if the pudding rises over the edge of the basin. Use some kitchen string to tie the lid tightly to the basin (see picture above).

5. Carefully place the pudding basin into the saucepan, centering it on the bowl at the bottom. Using the hot water from the kettle, pour the water into the saucepan until it comes half way up the pudding basin.

6. Set over medium heat and bring to the boil. Cover the saucepan with a lid and reduce the heat to low so that the water is gently simmering. Check the water periodically during the cooking time and top up with more water if needed.

7. Cook for approximately 90 minutes. Check if cooked by inserting a wooden skewer through the paper/foil lid and into the pudding. If it comes out cleanly, it is ready. If not, cook for another 20 minutes and check again.

8. Once cooked, remove the pudding from the heat, remove the lid of the saucepan and the lid of the pudding basin. Leave to sit for at least 30 minutes so that the jam sets a little.

9. Remove the pudding basin from the saucepan and turn the pudding out onto a plate.

10. Serve immediately with cream, custard or ice cream.


Japanese soy chicken

I've been a bit sick this week. And this dish is, without fail, what I want to eat when I get sick. I don't know why this is, but I just crave a huge feed of this chicken with rice or noodles.

Might be the salt or the protein in the chicken. I don't what it is, but this is what I'm looking for when I'm sick. And again, I gobbled it up and felt much better afterwards.

This was a recipe inspired from the wonderful Donna Hay. I ordered two of Ms Hay's cookbooks online and they were delivered this week. Talk about cooking inspiration! Some beautiful recipes which I'll be borrowing much from soon.

The inspiration for this chicken recipe came from the book 'Fast, Fresh, Simple'. Ms Hay's recipe was for Chinese soy chicken, but I only had Japanese-style ingredients in my cupboard, so I changed it around a little. The result was beautiful, silky chicken with slippery udon noodles. Just what I felt like.


What you'll need

Serves two, or one hungry sick person

2 medium chicken breasts
2 tbls Mirin
1 tbls dark soy sauce
1 tbls fish sauce
1 small red chilli, chopped plus extra for serving
2 eschallots, roughly chopped
2 cups chicken stock (low salt variety if possible) or just use water
1 clove garlic, chopped
1 thumb-sized piece fresh ginger, peeled and finely chopped

Noodles or steamed rice and vegetables to serve
Fresh chopped mint to serve

What to do


Place all ingredients, apart from the chicken, in a large saucepan. Bring the mixture to a gentle simmer and cook for five minutes, reducing it slightly.

Add the whole chicken breasts and cook for approximately 5 minutes, then turn and cook for 5 minutes on the other side. Keep the lid on the pot during this time.

Remove once cooked and served immediately. You can drizzle some of the cooking broth onto your rice or vegetables for flavour. Serve sprinkled with some fresh chopped chilli and mint.

If you'd like, cook some noodles, or vegetables such as snow peas, beans or brocoli in the same broth. Simmer these gently until cooked, drain, then serve with the chicken. I cooked my udon noodles in the broth beside the chicken and they were beautifully flavoured.

Easy pizza fingers

Super-quick lunch idea for the blog today. 

These pizza fingers went down a treat, were quick to make and super yummy.

I made the base with focaccia, so it was just a matter of loading the topping on and putting it in the oven.

Easy and quick. Just the thing for lunch on a cold day. 

After I made this I remembered that many years ago, I worked in a restaurant that had pizza fingers on the menu. I think that it was the most popular thing on the menu and they were so great. Memories of long ago......


What you'll need

* Serves three or four for lunch with a side salad.

Two loaves of focaccia, approx 30cm x 20cm. You can use plain or buy with flavours such as garlic or herbs.
4 tbls tomato paste or pizza sauce
200g sliced meat, I used salami
Handful of seedless olives
200mg fresh mozzarella (or two cups grated cheese of your choice)

What to do

Place two tablespoons of the tomato sauce onto each piece of focaccia, spreading it right to the edge.

Next put the cheese, then sliced meat, then press the olives into the top.

Place into a pre-heated oven at 180 degrees. Bake for 15 minutes, until the cheese is melted and the other toppings are slightly browned.

Once cooked, removed from the oven and let sit for a few minutes to let the cheese cool down a little. Then slice with a sharp knife into 5cm wide fingers.

Serve immediately with a big napkin for your fingers! No knives and forks required here people.


Monday, 22 October 2012

Chocolate Mousse


I have been making this chocolate mousse for so many years.... It is my standard, no-fail dinner party dessert recipe, guaranteed to please any guests, small or large. I first made this for my boyfriend at the time, about 14 years ago. It must have been OK, because he married me! The recipe is based on one from David Herbert, who writes for the Australian Magazine. I really like David's recipes. He's a no-nonsense cook, who has some lovely flavour combinations.

This is not a light and fluffy mousse, rather it is velvety and rich. You only need to serve a very small portion. I usually serve it with some fresh berries, a little something to break the sweetness of the mousse. You can add alcohol to the mix, such as rum or brandy, to add some extra flavour.

I serve this mousse in individual dishes, for example tea cups, champagne flutes, wine glasses, small glass ramekins etc. It makes for a lovely presentation when you bring it to the table. 

What you'll need

Makes approximately 8 serves (half-cup measurement)

350ml Nestle condensed milk
300g dark chocolate
3 large eggs, separated
300ml mascapone or thickened cream


What to do


Pour the condensed milk into a small saucepan. Heat over low heat. Break the chocolate into pieces and add to the condensed milk. Stir continuously until the chocolate is melted, then remove from the heat and leave to cool for 10 minutes. Then add the three egg yolks. Stir well until incorporated.

With electric beaters, whip the egg whites in a bowl until stiff peaks form (approximately 3 minutes). Set aside.

In another bowl, pour the cream and mix for a minute with the beaters so there are soft peaks.

Pour the chocolate mixture into the cream and fold the two together until well incorporated. Then gently fold the egg whites into the cream/chocolate mixture until just combined.

Now carefully pour the mixture into whichever serving container you have, and put into the fridge to set for at least 6 hours. I use about a half-cup measure for each serving. It helps to use a ladle to pour the mixture, as there is less mess and drips to clean up afterwards.

Once set, remove from the fridge and serve with berries or a small dallop of cream on the top of the mousse.

This dessert is completely luscious and a really special treat. Sometimes I make extra, so I've got some little pots in the bottom of the fridge for afterwards. But ssshhhhh, don't tell anyone!